Update/Rebuild NTA1000 System Drive
This article provides instructions for rebuilding the system drive of your NTA1000 to the factory default state. This might need to be done to bring your system drive up to the latest operating system. It might also need to be done in case of any corruption of the filesystem.
NOTE: The instructions below are for NTA1000v7, NTA1000v6, NTA1000v5 hardware platforms only. If you have an older NTA1000(v1,v2,v3,v4), please contact the QA Cafe Support team support@qacafe.com. If you have an NTA3000, please refer to this document.
Release Notes for NTA system images: Disk Image Release Notes
Background
Your NTA1000 has two internal drives: a system drive and a data drive. The system drive contains the Linux operating system, CDRouter software, and the qacafe user account directory. The data drive contains all of your CDRouter data (configs, packages, results, etc.).
If you have any files on the system drive that you want to restore later, please back them up before performing this operation. Rebuilding a drive will PERMANENTLY DELETE all existing files on the drive. Since only the system drive will be rebuilt, CDRouter data located on the data drive will not be affected by this. However, it’s still a good idea and good practice to perform a backup of your data drive as well.
NOTE: This procedure requires an active Internet connection on the NTA1000. All steps in the procedure below will be executed directly from your NTA1000 system. If the NTA1000 does not have Internet access, consider temporarily connecting it to the internet just for this procedure. If this is not possible, please contact the QA Cafe Support team support@qacafe.com.
Step 1: Install the nta1000-create-image package
The QA Cafe nta1000-create-image package may be installed automatically from the
QA Cafe rpm repository using the yum command. The exact command to use will be
determined by the operating system you’re currently running. Look at the output from
the following command.
cat /etc/redhat-release
You should see something like one of the following:
Rocky Linux release 8.10 (Green Obsidian)
Rocky Linux release 8.8 (Green Obsidian)
Rocky Linux release 8.6 (Green Obsidian)
Rocky Linux release 8.4 (Green Obsidian)
CentOS Linux release 8.1.1911 (Core)
CentOS Linux release 7.7.1908 (Core)
-
For Rocky Linux release 8.x: A version of the nta1000-create-image package should already be installed, but be sure to get the latest version:
yum install nta1000-create-image -
For CentOS Linux release 8.x:
yum install --disablerepo="*" --enablerepo=nta1000-base nta1000-create-image -
For CentOS Linux release 7.x (or earlier):
yum update --disablerepo=nta1000-base --disablerepo=nta1000-updates --disablerepo=nta1000-kernel ca-certificates
yum install --enablerepo=nta1000-base nta1000-create-image
This will install a python script in the /usr/share/nta1000/bin directory. This script will be used in the next step.
Step 2: Create the bootable USB drive
The create-image.py script creates a bootable USB drive that
is used to clone a new system image onto the system drive of the NTA1000.
-
To get started, plug a USB drive into the NTA1000. Note that the USB drive will be overwritten, so any data currently on the drive will be destroyed.
-
Next, run the
create-image.pyscript as the root user using the following command:/usr/share/nta1000/bin/create-image.pyThe script will verify that a properly sized USB drive (>= 4GB) exists and will abort if one is not found.
-
If a properly sized USB drive is found, the script will download and copy the appropriate QA Cafe Disk Image Utility package from the QA Cafe repository server and then burn it to the USB drive.
-
Once the image utility has been burned to the USB drive, the script will provide additional instructions for properly booting the system from the USB drive.
- Press
pto power off the system and continue with Step 3 below. - Press
cto exit the utility if you wish to continue the procedure later instead.
- Press
Step 3: Boot the NTA1000 from the USB drive
At this step in the process you will need to interrupt the normal boot process of the NTA system. To do this please follow the steps below:
-
Attach a VGA monitor and a USB keyboard to the NTA1000.
-
Insert the bootable USB drive created in the previous step inserted into a free USB slot on the NTA1000.
-
Power on the NTA1000 system.
-
As the NTA1000 boots, it’s important to monitor the screen closely. Press the F7 key to get to the boot menu when the initial splash screen is displayed on the monitor.
-
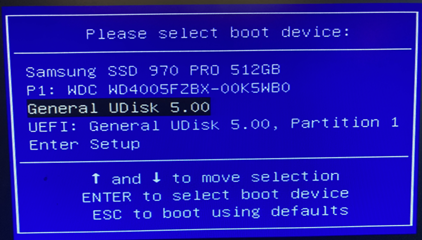
Select the USB drive and press enter. DO NOT select any USB entry with UEFI Note that the screenshot below is only an example of what may be displayed; the exact output may be different in some cases.
Step 4: Install System Image from USB drive
-
After the NTA1000 boots from the USB drive, you will be provided with a menu.
-
Select
(s)Rebuild system drive - This will begin the imaging process. -
After the imaging process completes, the menu will be displayed again.
-
Remove the USB drive, then select
(r)Reboot to reboot your system. -
Once the NTA1000 has rebooted, it should be running Rocky Linux 8. This may be verified by logging in as the root user and running the following command in a terminal window:
cat /etc/rocky-release
Output should be:
Rocky Linux release 8.10 (Green Obsidian)
Step 5: Install CDRouter software and license
Now that the system drive has been successfully rebuilt, CDRouter must be reinstalled.
Please follow the instructions in the “Manual installation using the command line” section of the CDRouter Installation Guide.
Once CDRouter has been reinstalled, an active CDRouter license file must also be installed. This can be done automatically by running the following command:
cdrouter-cli -update-license
The following command may be used to verify that CDRouter and a valid, active license file have been properly installed:
cdrouter-cli -info
CDRouter’s web UI, and all CDRouter data should now be available.
