CDRouter SNMP User Guide
Introduction
CDRouter SNMP is an expansion for CDRouter, the industry’s leading CPE and router test platform. CDRouter SNMP adds Simple Network Management Protocol (SNMP) test capabilities to CDRouter.
In a residential or SOHO environment, SNMP functionality is typically integrated directly within the CPE device. CDRouter SNMP supports testing SNMP implementations over a wide range of IPv4 and IPv6 network configurations as well as both UDP and TCP transports. CDRouter SNMP provides an instant regression environment for testing SNMP functionality, and is powerful, easy to use, and fully automated.
CPE Devices with Integrated SNMP Functionality
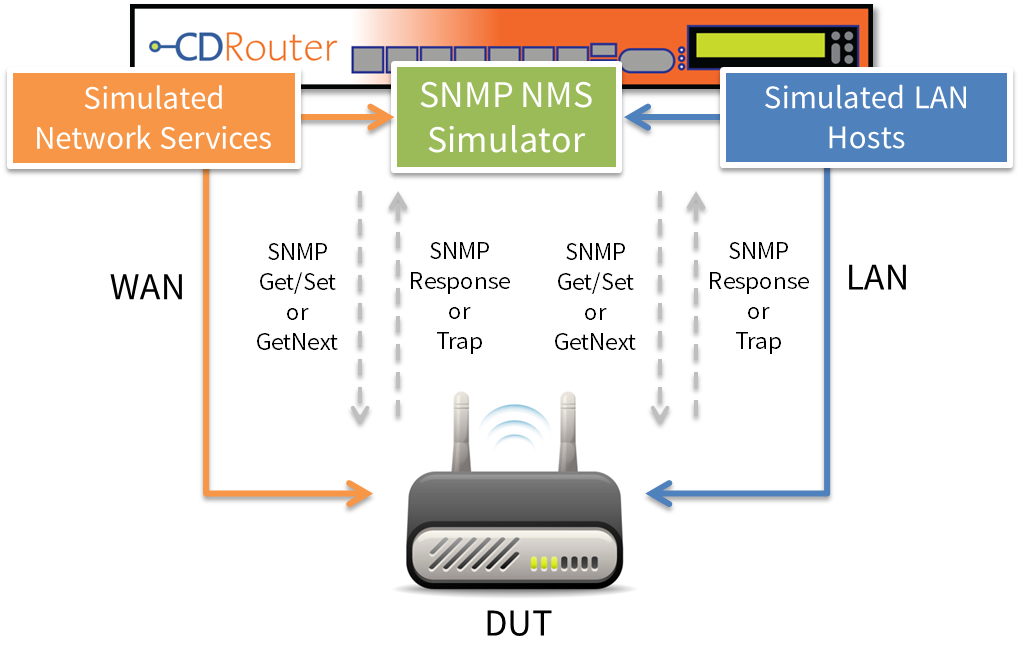
Many modern CPE devices support integrated SNMP functionality. Such devices typically include management tools for provisioning access to SNMP from managers on the LAN and WAN. In many CPE devices LAN access is allowed while WAN access is restricted.
The test setup for a typical CPE device with integrated SNMP functionality is shown below:
SNMP Versions
CDRouter SNMP includes a number of test modules designed to verify SNMP functionality for SNMP v1/2c/3 clients, access controls and common MIBs in today’s leading CPE devices. CDRouter SNMP allows the following SNMP commands, or PDUs, to be tested:
- GetRequest
- GetNextRequest
- GetBulkRequest
CDRouter SNMP also allows the following MIBs to be tested:
- ifMIB
- IF-MIB::ifTable
- DISMAN-EVENT-MIB::sysUpTimeInstance
- IP-MIB::ipForwarding
- IP-MIB::ipAddrTable
- RFC1213-MIB::ipRouteTable
Separate test modules for both SNMP over IPv4 on the LAN, SNMP over IPv6 on the LAN, SNMP over IPv4 on the WAN and SNMP over IPv6 over the WAN are provided. This level of granularity allows issues or inconsistencies within an SNMP implementation to be quickly identified and isolated.
Test Methodology
Initial Setup
CDRouter SNMP can be used with any CPE or gateway device with integrated SNMP functionality, provided the SNMP users configured in CDRouter match those configured on the device.
Terminology
The CPE or gateway device contains an SNMP agent which responds to requests from an SNMP manager. CDRouter will automatically create an SNMP manager instance on the LAN or WAN during each SNMP test case.
Start-Up
CDRouter SNMP does not modify or impact the normal CDRouter start-up procedure performed at the beginning of every test run. However, at the start of each SNMP related test the SNMP user configuration to be tested is determined. This procedure is discussed in more detail below.
SNMP Users
CDRouter SNMP allows an arbitrary number of SNMP user configurations to be created. Each SNMP user configuration is defined as a unique snmpuser testvar_group in the CDRouter configuration file. A full description of all of the testvars available for each snmpuser testvar_group instance is defined in the Configuration section of this User Guide.
At the start of each SNMP test CDRouter will choose an snmpuser configuration to test. For SNMP tests that do not have restrictions on what type of SNMP user they can run with, CDRouter chooses the snmpuser configuration to test based on the value of the snmpDefaultUser testvar. If this testvar is set to the special value auto, CDRouter will implicitly configure a default user that supports SNMP version 2c and a community string of public, and read-only access. Otherwise, it will test using the SNMP user defined by snmpDefaultUser.
If no snmpuser testvar_group’s are defined in the CDRouter configuration file, snmpDefaultUser must be set to the value auto or all SNMP related test cases will be skipped.
Some test cases require an SNMP user configured to communicate with the CPE’s SNMP implementation using a specific version of SNMP, such as 2c or 3. CDRouter will automatically search the list of defined snmpuser configurations for a user with the appropriate version for each test that is performed.
Running
SNMP support can be enabled within CDRouter by uncommenting the testvar
supportsSnmp and setting it to a value of “yes”. If testing SNMP related
functionality over IPv6, IPv6 must also be enabled and and properly configured.
Please see the CDRouter IPv6 User’s Guide for more information on configuring
CDRouter for IPv6.
CDRouter SNMP includes a number of test modules designed to verify a wide variety of SNMP related functionality over both IPv4 and IPv6 from the LAN and WAN interface. The following table summarizes the different test modules included with CDRouter SNMP:
| Test Module | Interface | Protocol |
|---|---|---|
| snmp.tcl | LAN | IPv4 |
| snmp-wan.tcl | WAN | IPv4 |
| snmp-v6.tcl | LAN | IPv6 |
| snmp-wan-v6.tcl | WAN | IPv6 |
Source and Destination Addresses
At the start of each test CDRouter will automatically choose a source and destination address. The destination address is the address used by the SNMP agent on the CPE or gateway device. The source address is the address used by CDRouter’s integrated SNMP manager.
The table below summarizes the source and destination addresses used by CDRouter in each SNMP test module:
| Test Module | Source Address | Destination Address |
|---|---|---|
| snmp.tcl | Learned IPv4 address | lanIp |
| snmp-wan.tcl | snmpManagerIp | wanIspAssignIp |
| snmp-docsis.tcl | docsisDhcpServer | docsisAssignIp |
| snmp-v6.tcl | Learned IPv6 address | ipv6LanIp |
| snmp-wan-v6.tcl | snmpManagerIpv6 | ipv6WanIspAssignIp |
| snmp-docsis-v6.tcl | docsisDhcpIpv6Server | docsisAssignIpv6 |
Licensing
To utilize CDRouter’s SNMP test capabilities, your license file must have the CDRouter SNMP expansion enabled. In addition, if you plan to test SNMP functionality over IPv6 your license file must also have the CDRouter IPv6 add- on enabled.
For information on upgrading your license to support CDRouter SNMP or CDRouter IPv6, please contact sales@qacafe.com. Please follow the instructions from support@qacafe.com when updating your license file to enable CDRouter SNMP or CDRouter IPv6.
CDRouter will report the status of all available expansions during the installation
process and during startup. To verify that CDRouter SNMP and optionally
CDRouter IPv6 are enabled on your system, execute the command cdrouter-cli -info as root and look for the lines “SNMP is enabled” and “IPv6 is enabled”,
as shown below. If these lines are present, CDRouter SNMP and CDRouter IPv6,
respectively, are enabled and ready to use.
$ cdrouter-cli -info

Starting cdrouter-cli Fri Mar 25 13:28:42 EDT 2016
Copyright (c) 2001-2016 by QA Cafe
Version 10.0 build 1 (21410 trunk), built 2016-03-24 17:36:47 by nightly@cdr-forge6.lan (x86_64)
Loaded OS distro \S Kernel \r on an \m
Loaded OS version Linux-3.10.0-327.10.1.el7.x86_64 x86_64
Loaded Tcl version 8.6.4
Loaded buddy version 10.0.1
(builder@kbuilder.dev.centos.org) (gcc version 4.8.3 20140911 (Red Hat 4.8.3-9) (GCC) )
Trying to load modules from '.'
Trying to load modules from '/usr/cdrouter/tests'
Start command: /usr/cdrouter/bin/cdrouter-cli -info
Test Suite cdrouter 10.0.1
The system ID is 2df9e2a1f8c359183cf0191a20f2cc5a
Using license installed at: /etc/cdrouter.lic
Registered to: qacafe
Maintenance, Support and Upgrades until: 2016-05-11
Licensed to run: cdrouter
    Multiport   is enabled
    IPv6        is enabled
    Storage     is enabled
    IKE         is enabled
    TR69        is enabled
    TR69-EDM    is enabled
    Nmap        is enabled
    BBF.069     is enabled
    SNMP        is enabled
    Performance is disabled
CPU is Intel(R) Core(TM) i5-4308U CPU @ 2.80GHz, bogomips 5599.98
Loaded TclXML version 3.1 (libxml2), TclDOM 3.0, xmldefs 3.1
Trying to load modules from '/usr/cdrouter/vendor/IOL/BBF.069/Tests'
BBF.069 version 1.2.075-11 (19093)
Configuration
Global SNMP Configuration
CDRouter SNMP has several configuration options, also known as test variables, or “testvars” for short, that define the DUT and the test environment.
The following tables describe all of the new testvars available with the CDRouter SNMP expansion. The sections below group testvars by the protocol or functionality they define.
To globally enable SNMP support within CDRouter, the testvar supportsSnmp must
be set to a value of “yes”.
To change the port used for SNMP traffic on your device, set the value of
snmpPort.
To set the default SNMP user configuration used by tests that do not have restrictions on the type of SNMP users that they can run with, set the value of snmpDefaultUser.
To specify additional directories to search for MIB definitions, define snmpMibDirs.
To specify the update delay CDRouter should use when verifying that an OID value has changed, define snmpUpdateDelay.
SNMP User Configuration
The following testvars specify the IP and IPv6 address that CDRouter will use as the source of all SNMP requests from the WAN. If the DUT restricts SNMP access to specific addresses or address ranges, be sure to set these testvars to an address that the DUT will accept.
snmpManagerIpsnmpManagerIpv6docsisDhcpServer- for DOCSIS SNMP testingdocsisDhcpIpv6Server- for IPv6 DOCSIS SNMP testing
Each snmpuser testvar_group is independent and defines a unique test
configuration. The snmpVersion testvar must be defined and must
be set to 1, 2c or 3.
If snmpVersion is set to 1 or 2c, the snmpCommunity
testvar must be defined and specifies the user’s membership in
the given SNMP community. In SNMP v1/v2c, each SNMP community may have
differing access controls such as read-only/read-write access, access to
specific OIDs, or access from certain interfaces or IP ranges.
If snmpVersion is set to 3, the snmpSecurityLevel
testvar must be defined. SNMP v3 defines an optional set
of security features that are designed to address the security deficiencies in
SNMP v1/v2c. An SNMP v3 user can be configured with authentication, privacy or
both. A user configured with authentication must provide a valid username and
password. A user configured with privacy uses a second password along with
encryption to communicate confidentially with the SNMP agent.
The snmpSecurityLevel testvar specifies the SNMP v3 security
settings for the SNMP user. Three different security levels are supported:
-
noAuthNoPriv: The user will send unauthenticated messages without encryption.
-
authNoPriv: The user will send authenticated messages without encryption.
-
authPriv: The user will send authenticated and encrypted messages.
If this option is set to a value of authNoPriv or authPriv, the testvars
snmpAuthProtocol, snmpAuthUsername, and snmpAuthPassword
must all be defined.
Likewise, if this option is set to a value of authPriv, the testvars snmpPrivacyProtocol
and snmpPrivacyPassword must be
defined.
The snmpTransport testvar determines if the user will use UDP or
TCP as the transport protocol when sending SNMP traffic.
If defined, the snmpRetries and snmpTimeout
testvars specify the number of retries and the delay in seconds between each
retry for failed SNMP requests made by the user, respectively.
Configuration Notes - Required User Versions
Certain test cases require SNMP users configured with specific versions of SNMP. CDRouter will automatically skip tests if there does not exist at least one SNMP user configuration that meets its criteria. The table below lists the required criteria for each test case, by test module.
| Test Name | SNMP version |
|---|---|
| ipv6_snmp_301 | v1 or v2c |
| ipv6_snmp_wan_301 | v1 or v2c |
| snmp_301 | v1 or v2c |
| snmp_wan_301 | v1 or v2c |
| ipv6_snmp_304 | v2c or v3 |
| ipv6_snmp_305 | v2c or v3 |
| ipv6_snmp_wan_304 | v2c or v3 |
| ipv6_snmp_wan_305 | v2c or v3 |
| snmp_304 | v2c or v3 |
| snmp_305 | v2c or v3 |
| snmp_wan_304 | v2c or v3 |
| snmp_wan_305 | v2c or v3 |
| ipv6_snmp_302 | v3 |
| ipv6_snmp_303 | v3 |
| ipv6_snmp_wan_302 | v3 |
| ipv6_snmp_wan_303 | v3 |
| snmp_302 | v3 |
| snmp_303 | v3 |
| snmp_wan_302 | v3 |
| snmp_wan_303 | v3 |
Example Configurations
There is a wide variety of SNMP configurations and functionality that can be tested with CDRouter SNMP. A few basic example configurations for common SNMP testing environments are provided below.
Example 1: SNMP v2c User
In this example a single SNMP user configuration is defined and set as the default SNMP user. An SNMP version 2c community named mycommunity is configured on the DUT.
NOTE: Since no SNMP v3 users are defined in this configuration, all tests requiring at least one SNMP v3 user will be automatically skipped by CDRouter.
SECTION "CDRouter SNMP: Basic Setup" {

    testvar supportsSnmp                     yes
    testvar snmpDefaultUser                  snmpuser1

    SECTION "SNMP Users Setup" {

        testvar_group snmpuser1 {

            testvar snmpVersion                      2c

            SECTION "SNMP version 1/2c Configuration" {

                testvar snmpCommunity                    mycommunity

            }

        }

    }

}
Example 2: SNMP v3 User without authentication or privacy
In this example a single SNMP user configuration is defined and set as the default SNMP user. An unauthenticated, unencrypted SNMP version 3 user is configured on the DUT.
NOTE: Since no SNMP v1/v2c users are defined in this configuration, all tests requiring at least one SNMP v1/v2c user will be automatically skipped by CDRouter.
SECTION "CDRouter SNMP: Basic Setup" {

    testvar supportsSnmp                     yes
    testvar snmpDefaultUser                  snmpuser1

    SECTION "SNMP Users Setup" {

        testvar_group snmpuser1 {

            testvar snmpVersion                      3

            SECTION "SNMP version 3 Configuration" {

                testvar snmpSecurityLevel                noAuthNoPriv

            }

        }

    }

}
Example 3: SNMP v3 User with authentication, without privacy
In this example a single SNMP user configuration is defined and set as the default SNMP user. An authenticated, unencrypted SNMP version 3 user named myuser is configured on the DUT using the MD5 authentication protocol and username/password qacafe/qacafe123.
NOTE: Since no SNMP v1/v2c users are defined in this configuration, all tests requiring at least one SNMP v1/v2c user will be automatically skipped by CDRouter.
SECTION "CDRouter SNMP: Basic Setup" {

    testvar supportsSnmp                     yes
    testvar snmpDefaultUser                  snmpuser1

    SECTION "SNMP Users Setup" {

        testvar_group snmpuser1 {

            testvar snmpVersion                      3

            SECTION "SNMP version 3 Configuration" {

                testvar snmpSecurityLevel                authNoPriv

                testvar snmpAuthProtocol                 MD5
                testvar snmpAuthUsername                 qacafe
                testvar snmpAuthPassword                 qacafe123

            }

        }

    }

}
Example 4: SNMP v3 User with authentication and privacy
In this example a single SNMP user configuration is defined and set as the default SNMP user. An authenticated, encrypted SNMP version 3 user named myuser is configured on the DUT using the MD5 authentication protocol and authentication username/password qacafe/qacafe123. The SNMP user on the DUT is configured with privacy using the privacy protocol DES and privacy password qacafe123.
NOTE: Since no SNMP v1/v2c users are defined in this configuration, all tests requiring at least one SNMP v1/v2c user will be automatically skipped by CDRouter.
SECTION "CDRouter SNMP: Basic Setup" {

    testvar supportsSnmp                     yes
    testvar snmpDefaultUser                  snmpuser1

    SECTION "SNMP Users Setup" {

        testvar_group snmpuser1 {

            testvar snmpVersion                      3

            SECTION "SNMP version 3 Configuration" {

                testvar snmpSecurityLevel                authPriv

                testvar snmpAuthProtocol                 MD5
                testvar snmpAuthUsername                 qacafe
                testvar snmpAuthPassword                 qacafe123

                testvar snmpPrivacyProtocol              DES
                testvar snmpPrivacyPassword              qacafe123

            }

        }

    }

}
Supported MIBs
CDRouter SNMP ships with support for the following MIBs:
ACCOUNTING-CONTROL-MIBADSL2-LINE-MIBADSL2-LINE-TC-MIBADSL-LINE-EXT-MIBADSL-LINE-MIBADSL-TC-MIBAGENTX-MIBAGGREGATE-MIBALARM-MIBAPM-MIBAPPC-MIBAPPLETALK-MIBAPPLICATION-MIBAPPN-DLUR-MIBAPPN-MIBAPPN-TRAP-MIBAPS-MIBARC-MIBATM2-MIBATM-ACCOUNTING-INFORMATION-MIBATM-MIBATM-TC-MIBBGP4-MIBBLDG-HVAC-MIBBRIDGE-MIBCHARACTER-MIBCIRCUIT-IF-MIBCLNS-MIBCOFFEE-POT-MIBCOPS-CLIENT-MIBDECNET-PHIV-MIBDIAL-CONTROL-MIBDIFFSERV-CONFIG-MIBDIFFSERV-DSCP-TCDIFFSERV-MIBDIRECTORY-SERVER-MIBDISMAN-EVENT-MIBDISMAN-EXPRESSION-MIBDISMAN-NSLOOKUP-MIBDISMAN-PING-MIBDISMAN-SCHEDULE-MIBDISMAN-SCRIPT-MIBDISMAN-TRACEROUTE-MIBDLSW-MIBDNS-RESOLVER-MIBDNS-SERVER-MIBDOCS-BPI-MIBDOCS-CABLE-DEVICE-MIBDOCS-IETF-BPI2-MIBDOCS-IETF-CABLE-DEVICE-NOTIFICATION-MIBDOCS-IETF-QOS-MIBDOCS-IETF-SUBMGT-MIBDOCS-IF-MIBDOT12-IF-MIBDOT12-RPTR-MIBDOT3-EPON-MIBDOT3-OAM-MIBDS0BUNDLE-MIBDS0-MIBDS1-MIBDS3-MIBDSA-MIBDSMON-MIBEBN-MIBEFM-CU-MIBENTITY-MIBENTITY-SENSOR-MIBENTITY-STATE-MIBENTITY-STATE-TC-MIBETHER-CHIPSET-MIBEtherLike-MIBETHER-WISFCIP-MGMT-MIBFC-MGMT-MIBFDDI-SMT73-MIBFIBRE-CHANNEL-FE-MIBFinisher-MIBFLOW-METER-MIBFRAME-RELAY-DTE-MIBFR-ATM-PVC-SERVICE-IWF-MIBFR-MFR-MIBFRNETSERV-MIBFRSLD-MIBGMPLS-LABEL-STD-MIBGMPLS-LSR-STD-MIBGMPLS-TC-STD-MIBGMPLS-TE-STD-MIBGSMP-MIBHC-ALARM-MIBHCNUM-TCHC-PerfHist-TC-MIBHC-RMON-MIBHDSL2-SHDSL-LINE-MIBHOST-RESOURCES-MIBHOST-RESOURCES-TYPESHPR-IP-MIBHPR-MIBIANA-ADDRESS-FAMILY-NUMBERS-MIBIANA-CHARSET-MIBIANA-FINISHER-MIBIANA-GMPLS-TC-MIBIANAifType-MIBIANA-IPPM-METRICS-REGISTRY-MIBIANA-ITU-ALARM-TC-MIBIANA-LANGUAGE-MIBIANA-MALLOC-MIBIANA-MAU-MIBIANA-PRINTER-MIBIANA-RTPROTO-MIBIANATn3270eTC-MIBIF-CAP-STACK-MIBIFCP-MGMT-MIBIF-INVERTED-STACK-MIBIF-MIBIGMP-STD-MIBINET-ADDRESS-MIBINTEGRATED-SERVICES-GUARANTEED-MIBINTEGRATED-SERVICES-MIBINTERFACETOPN-MIBIPATM-IPMC-MIBIP-FORWARD-MIBIPMCAST-MIBIP-MIBIPMROUTE-STD-MIBIPOA-MIBIPS-AUTH-MIBIPSEC-SPD-MIBIPV6-FLOW-LABEL-MIBIPV6-ICMP-MIBIPV6-MIBIPV6-MLD-MIBIPV6-TCIPV6-TCP-MIBIPV6-UDP-MIBIRTF-NMRG-SMINGIRTF-NMRG-SMING-EXTENSIONSIRTF-NMRG-SMING-TYPESISCSI-MIBISDN-MIBISIS-MIBISNS-MIBITU-ALARM-MIBITU-ALARM-TC-MIBJob-Monitoring-MIBL2TP-MIBLANGTAG-TC-MIBLMP-MIBMALLOC-MIBMAU-MIBMIDCOM-MIBMIOX25-MIBMIP-MIBMOBILEIPV6-MIBModem-MIBMPLS-FTN-STD-MIBMPLS-L3VPN-STD-MIBMPLS-LC-ATM-STD-MIBMPLS-LC-FR-STD-MIBMPLS-LDP-ATM-STD-MIBMPLS-LDP-FRAME-RELAY-STD-MIBMPLS-LDP-GENERIC-STD-MIBMPLS-LDP-STD-MIBMPLS-LSR-STD-MIBMPLS-TC-STD-MIBMPLS-TE-STD-MIBMSDP-MIBMTA-MIBNAT-MIBNET-SNMP-AGENT-MIBNET-SNMP-EXAMPLES-MIBNET-SNMP-EXTEND-MIBNET-SNMP-MIBNET-SNMP-PASS-MIBNET-SNMP-TCNETWORK-SERVICES-MIBNHRP-MIBNOTIFICATION-LOG-MIBOPT-IF-MIBOSPF-MIBOSPF-TRAP-MIBPARALLEL-MIBP-BRIDGE-MIBPerfHist-TC-MIBPIM-MIBPIM-STD-MIBPINT-MIBPKTC-IETF-MTA-MIBPKTC-IETF-SIG-MIBPOLICY-BASED-MANAGEMENT-MIBPOLICY-DEVICE-AUX-MIBPOLICY-DEVICE-AUX-MIB-origPOWER-ETHERNET-MIBPPP-BRIDGE-NCP-MIBPPP-IP-NCP-MIBPPP-LCP-MIBPPP-SEC-MIBPrinter-MIBPTOPO-MIBQ-BRIDGE-MIBRADIUS-ACC-CLIENT-MIBRADIUS-ACC-SERVER-MIBRADIUS-AUTH-CLIENT-MIBRADIUS-AUTH-SERVER-MIBRADIUS-DYNAUTH-CLIENT-MIBRADIUS-DYNAUTH-SERVER-MIBRAQMON-MIBRDBMS-MIBRFC1065-SMIRFC1155-SMIRFC1158-MIBRFC-1212RFC1213-MIBRFC-1215RFC1269-MIBRFC1271-MIBRFC1285-MIBRFC1316-MIBRFC1381-MIBRFC1382-MIBRFC1414-MIBRIPv2-MIBRMON2-MIBRMON-MIBROHC-MIBROHC-RTP-MIBROHC-UNCOMPRESSED-MIBRS-232-MIBRSTP-MIBRSVP-MIBRTP-MIBSCSI-MIBSCTP-MIBSFLOW-MIBSIP-COMMON-MIBSIP-MIBSIP-SERVER-MIBSIP-TC-MIBSIP-UA-MIBSLAPM-MIBSMON-MIBSMUX-MIBSNA-NAU-MIBSNA-SDLC-MIBSNMP-COMMUNITY-MIBSNMP-FRAMEWORK-MIBSNMP-MPD-MIBSNMP-NOTIFICATION-MIBSNMP-PROXY-MIBSNMP-REPEATER-MIBSNMP-TARGET-MIBSNMP-USER-BASED-SM-MIBSNMP-USM-AES-MIBSNMP-USM-DH-OBJECTS-MIBSNMPv2-CONFSNMPv2-MIBSNMPv2-SMISNMPv2-TCSNMPv2-TMSNMPv2-USEC-MIBSNMP-VIEW-BASED-ACM-MIBSONET-MIBSOURCE-ROUTING-MIBSSPM-MIBSYSAPPL-MIBT11-FC-FABRIC-ADDR-MGR-MIBT11-FC-FABRIC-CONFIG-SERVER-MIBT11-FC-FABRIC-LOCK-MIBT11-FC-FSPF-MIBT11-FC-NAME-SERVER-MIBT11-FC-ROUTE-MIBT11-FC-RSCN-MIBT11-FC-VIRTUAL-FABRIC-MIBT11-FC-ZONE-SERVER-MIBT11-TC-MIBTCP-ESTATS-MIBTCPIPX-MIBTCP-MIBTE-LINK-STD-MIBTE-MIBTIME-AGGREGATE-MIBTN3270E-MIBTN3270E-RT-MIBTOKENRING-MIBTOKEN-RING-RMON-MIBTOKENRING-STATION-SR-MIBTRANSPORT-ADDRESS-MIBTRIP-MIBTRIP-TC-MIBTUBS-IBR-AGENT-CAPABILITIESTUBS-IBR-LINUX-MIBTUBS-IBR-LINUX-NETFILTER-MIBTUBS-IBR-NFS-MIBTUBS-IBR-PING-MIBTUBS-IBR-PROC-MIBTUBS-IBR-TEST-MIBTUBS-IBR-TNM-MIBTUBS-IBR-XEN-MIBTUBS-SMITUNNEL-MIBUCD-DEMO-MIBUCD-DISKIO-MIBUCD-DLMOD-MIBUCD-IPFWACC-MIBUCD-SNMP-MIBUDPLITE-MIBUDP-MIBUPS-MIBURI-TC-MIBVDSL-LINE-EXT-MCM-MIBVDSL-LINE-EXT-SCM-MIBVDSL-LINE-MIBVPN-TC-STD-MIBVRRP-MIBWWW-MIB
Custom MIBs
CDRouter SNMP supports loading custom MIB files. This will allow CDRouter SNMP
to display custom MIBs using the appropriate names/display hints and fully
decode SNMP packets containing custom OIDs in CDRouter’s web packet viewer.
Follow the steps below to ensure your custom MIB is fully integrated with
CDRouter SNMP. These commands must be run while logged in as the root user.
-
Create the directory
/usr/cdrouter/share/mibs/siteif it does not already exist$ mkdir /usr/cdrouter/share/mibs/site -
Place your custom MIB file in the newly-created directory. Its filename should be the same as the module it is defining
$ cp MY-CUSTOM-MIB.txt /usr/cdrouter/share/mibs/site -
Create the directory
/root/.wiresharkif it does not already exist. CDRouter is shipped with a version of wireshark to decode and display packet contents. The files in this directory tell wireshark which MIB files to load and how to display them in decoded SNMP packets.$ mkdir /root/.wireshark -
Make a copy of CDRouter’s
/usr/cdrouter/share/wireshark/smi_modulesfile and place it in the/root/.wiresharkdirectory.$ cp /usr/cdrouter/share/wireshark/smi_modules /root/.wireshark/smi_modules -
Edit the
/root/.wireshark/smi_modulesfile and add the name of your custom MIB in quotation marks to the file on its own line.# Default MIB modules to load "MY-CUSTOM-MIB" "IP-MIB" "IF-MIB" "TCP-MIB" "UDP-MIB" "SNMPv2-MIB" "RFC1213-MIB" "IPV6-ICMP-MIB" "IPV6-MIB" "SNMP-COMMUNITY-MIB" "SNMP-FRAMEWORK-MIB" "SNMP-MPD-MIB" "SNMP-NOTIFICATION-MIB" "SNMP-PROXY-MIB" "SNMP-TARGET-MIB" "SNMP-USER-BASED-SM-MIB" "SNMP-USM-DH-OBJECTS-MIB" "SNMP-VIEW-BASED-ACM-MIB"Note: This must be the actual name of the custom MIB module and not the name of the file it is defined in. The name of the MIB can be found in the “DEFINITIONS” line of the MIB file.
$ grep "DEFINITIONS" /usr/cdrouter/share/mibs/site/MY-CUSTOM-MIB.txt MY-CUSTOM-MIB DEFINITIONS ::= BEGIN -
Edit or create the file
/root/.wireshark/preferencesand ensure the following values are setnameres.mac_name: TRUE nameres.transport_name: TRUE nameres.network_name: TRUE nameres.load_smi_modules: TRUE nameres.suppress_smi_errors: FALSE -
Restart CDRouter
$ service cdrouter restart
SNMP Scenario Testing
SNMP Scenarios are lightweight custom test scripts you can develop to execute commands from CDRouter’s SNMP Manager to get, set and validate MIB objects.
Details can be found in the SNMP Scenario Scripting Guide in our Knowledge Base.
Testing Exercises
A great way to start testing an SNMP enabled CPE with CDRouter is to simply configure and run each of the applicable test modules included with the CDRouter SNMP expansion individually. Analysis of these initial results will provide valuable insight and may help identify basic functional issues within the DUT that should be addressed.
The following sections describe some of the more common advanced testing exercises that are possible with CDRouter SNMP.
Vary the IPv4/IPv6 Configuration
There are a number of different configuration scenarios that can be created with CDRouter which involve different combinations of IPv4 and IPv6 WAN and LAN modes and various configuration options. One simple yet powerful test exercise is to run the same set of SNMP tests while varying the underlying IPv4 and/or IPv6 configuration of the DUT. The DUT’s SNMP functionality should remain consistent across all of the IPv4 and IPv6 configuration scenarios supported.
Test with Wireless
The DUT’s SNMP related functionality should be consistent over both wired and wireless LAN interfaces. With CDRouter it is very easy to confirm this by adding at least one wireless LAN interface to your configuration file. In addition, SNMP functionality can be verified over all of the wireless modes and security schemes supported by the DUT.
Test with Different Timeout Values
CDRouter Storage includes configuration options for adjusting the SNMP user
retries, snmpRetries, and the timeout period in seconds between retries,
snmpTimeout. These options are useful for ensuring that the DUT is responsive
and capable of performing the desired operations within a practical amount of
time. If the DUT takes longer than 10 seconds to complete any operation,
CDRouter’s SNMP client will time out and the test will fail.
Verify Service Availability
Another good testing exercise is to verify that SNMP is indeed unavailable when it is disabled within the CPE’s management interface. Some implementations may continue to allow access through SNMP even if it is administratively disabled. With CDRouter this condition can be easily tested. Start by building a baseline configuration and test package for the various SNMP services supported by the DUT. Next, disable SNMP and verify that all applicable tests generate failures. In this scenario test failures represent positive results, indicating that SNMP is indeed disabled.
Test Different Users and Shares
With CDRouter SNMP an arbitrary number of SNMP user configurations can be defined. Including a variety of different user configurations in your CDRouter configuration file is a good way to verify the SNMP functionality of the DUT. Many different scenarios involving different SNMP versions, communities, security levels, and authentication/privacy protocols can be easily tested with CDRouter SNMP. Some simple examples are provided below:
-
Create two different users with different SNMP versions (such as v2c and v3).
-
Create two different SNMP v3 users with different security levels. User1 might be authenticated but not encrypted, whereas User2 may be authenticated and encrypted.
Verify Management Access Restrictions
CDRouter allows you to choose an arbitrary source address for all SNMP requests
via the snmpManagerIp and snmpManagerIpv6 testvars.
This can be used to indirectly verify that the DUT only responds to SNMP
requests from hosts from an authorized address or address range.
Duration Testing
The CDRouter UI allows for editing a package which includes a number of useful run-time options which can be utilized to ensure SNMP functionality over long durations. For example, with CDRouter you can easily repeat the same SNMP test (or tests) 1000 times to ensure robustness and consistent behavior.
Possible Problems
Firewall Preventing Access from WAN
Some devices support SNMP on the WAN but do not automatically create a firewall entry to allow access. If SNMP has been enabled on the WAN but tests are failing, check the firewall configuration. A firewall rule may need to be manually added to allow SNMP traffic.
Source Address Filtering
Some devices implement source address filtering to limit SNMP requests to a
specific, known set of IP addresses. CDRouter’s LAN IPv4 and IPv6 addresses and
the IPv4 and IPv6 remote host addresses (testvars remoteHostIp and ipv6RemoteHost,
respectively) should be added as allowed source addresses.