PassPort
Getting Started With PassPort
Welcome to PassPort! PassPort is easy to set up and use right out of the box. New users will find this quick-start guide helpful for installation and running their first tests.
1. Unpack PassPort
The box should contain:
- One (1) PassPort system
- One (1) universal power supply for PassPort
- One (1) power cable for the power supply
- Four (4) dual-band antennas
- One (1) RJ45 to USB cable assembly
- One (1) USB to DB9 cable
- One (1) Synaccess NP-02BH netBooter
- One (1) power cable for the Synaccess NP-02B
- Two (2) power extension cords
- Six (6) Ethernet cables
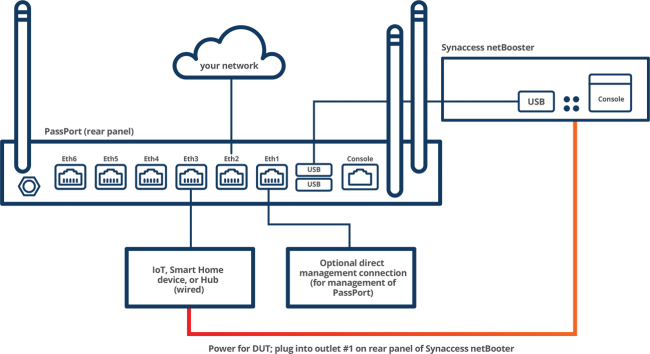
2. Connect and power on
- Plug the Synaccess NP-02BH into a 120V 60Hz power outlet using the supplied power cable.
- Connect the four dual-band antennas to PassPort.
- Connect the Eth2 port on PassPort to the LAN. Eth2 is the PassPort WAN interface and must have internet connectivity.
- Connect the round end of the power supply to PassPort.
- Connect the power supply to a 100-240V 50-60Hz power outlet using the supplied power cable.
- Connect the USB cable from PassPort to the Synaccess NP-02.
- Power on the Synaccess NP-02 before powering on PassPort. PassPort will power up automatically when the power supply is connected. The ON/OFF switch on the rear panel can be used to turn PassPort on or off.
3. Connecting the Device Under Test (DUT)
- Connect the DUT to PassPort via Ethernet or Wi-Fi. PassPort default Wi-Fi SSID and password can be found on a sticker on the bottom of the system.
- If the DUT requires a smart hub, connect the smart hub to PassPort via Ethernet or Wi-Fi, and connect the dUT to the smart hub via Zigbee, BlueTooth, Wi-Fi, etc.
- Connect the DUT’s power supply to one of the two power outlets on the Synaccess NP-02. Remember which outlet the DUT plugged into – this will be needed when selecting and running tests later.
Setup Diagram
4. Log in to the web UI
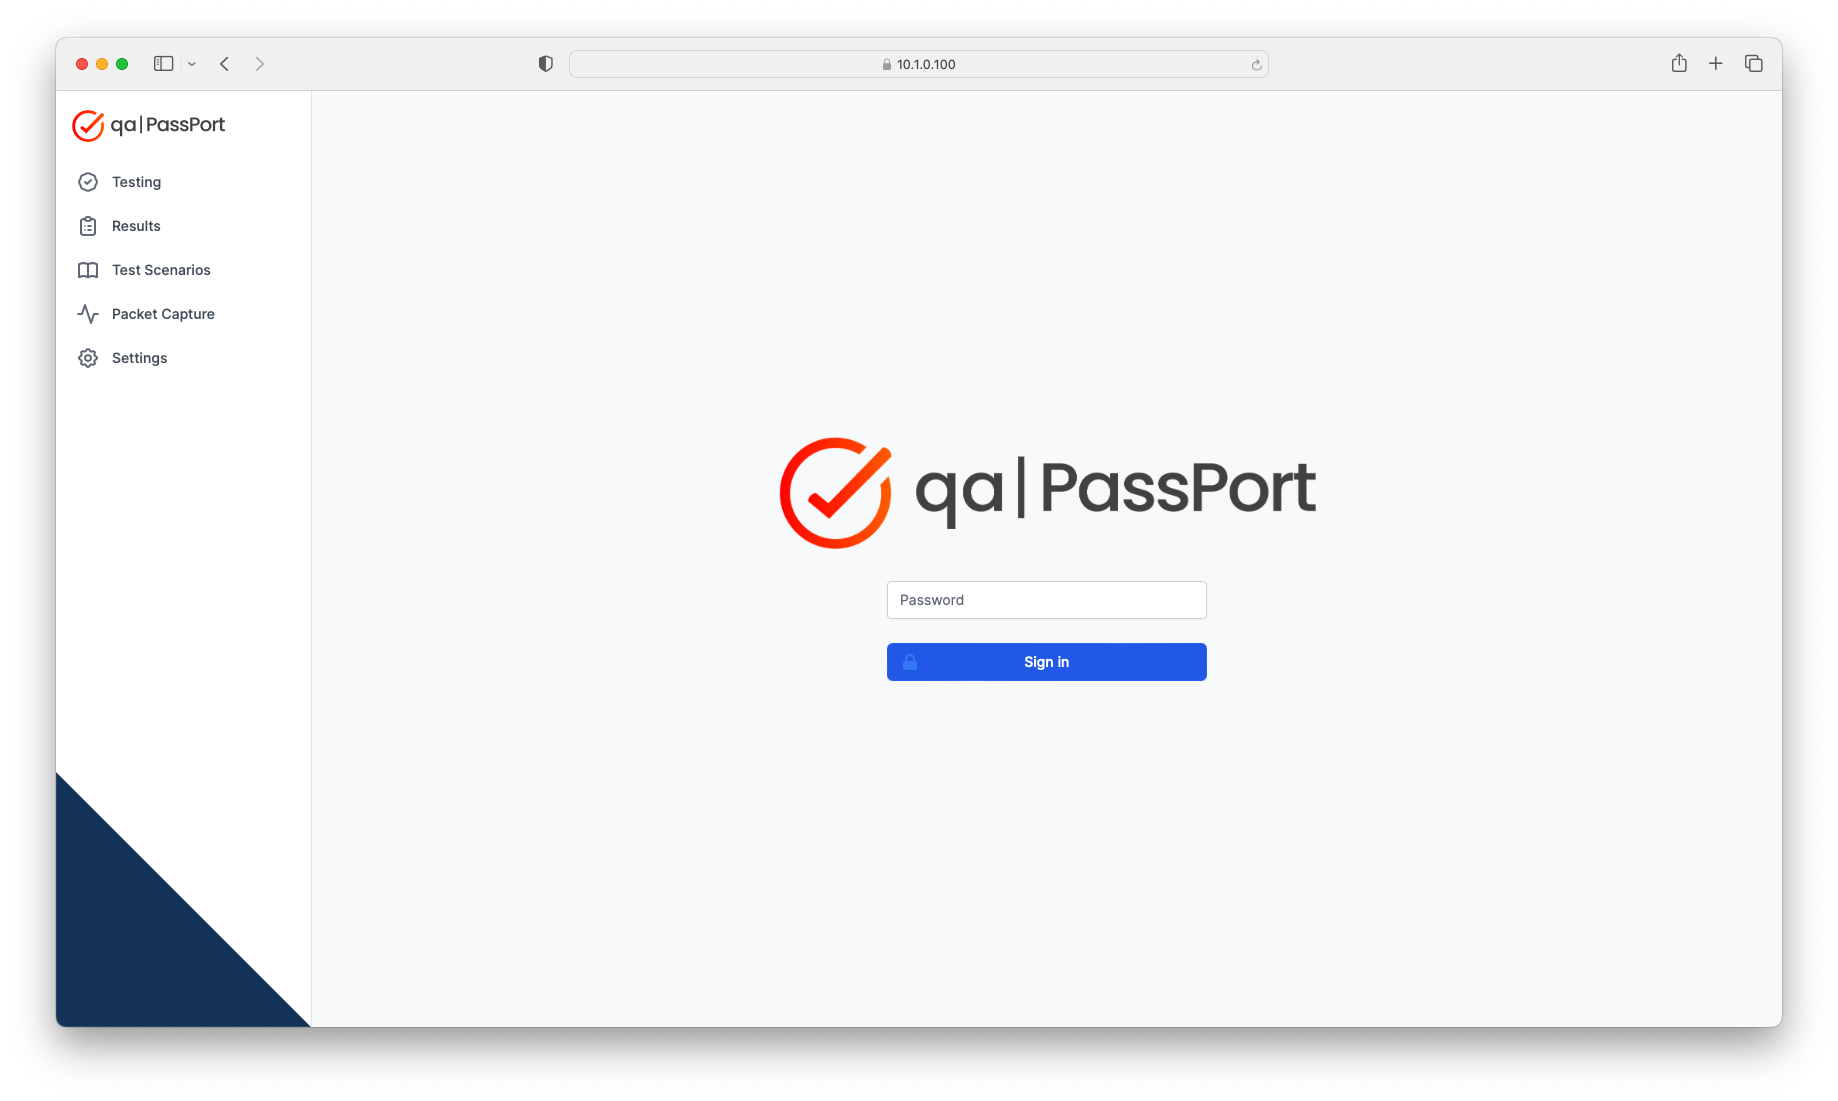
PassPort’s web UI is accessed through a network connection to Eth2. The dedicated management port, Eth1, can be used via direct connection if no other network is available.
- Connect the Eth2 port on PassPort to a network with an active DHCP server.
- Find the IP address assigned to PassPort WAN port in the DHCP server’s client lease table.
Note that PassPort’s hostname is
passport. - Using a PC or laptop connected to the same network, access PassPort’s web UI by opening
a web browser and connecting to
http://<IP address of PassPort>orhttps://<IP address of PassPort>. Note that all the warnings displayed by the browser must be accepted to connect over HTTPS. - Log in with the default password,
passport(all lower-case). - Welcome to PassPort!
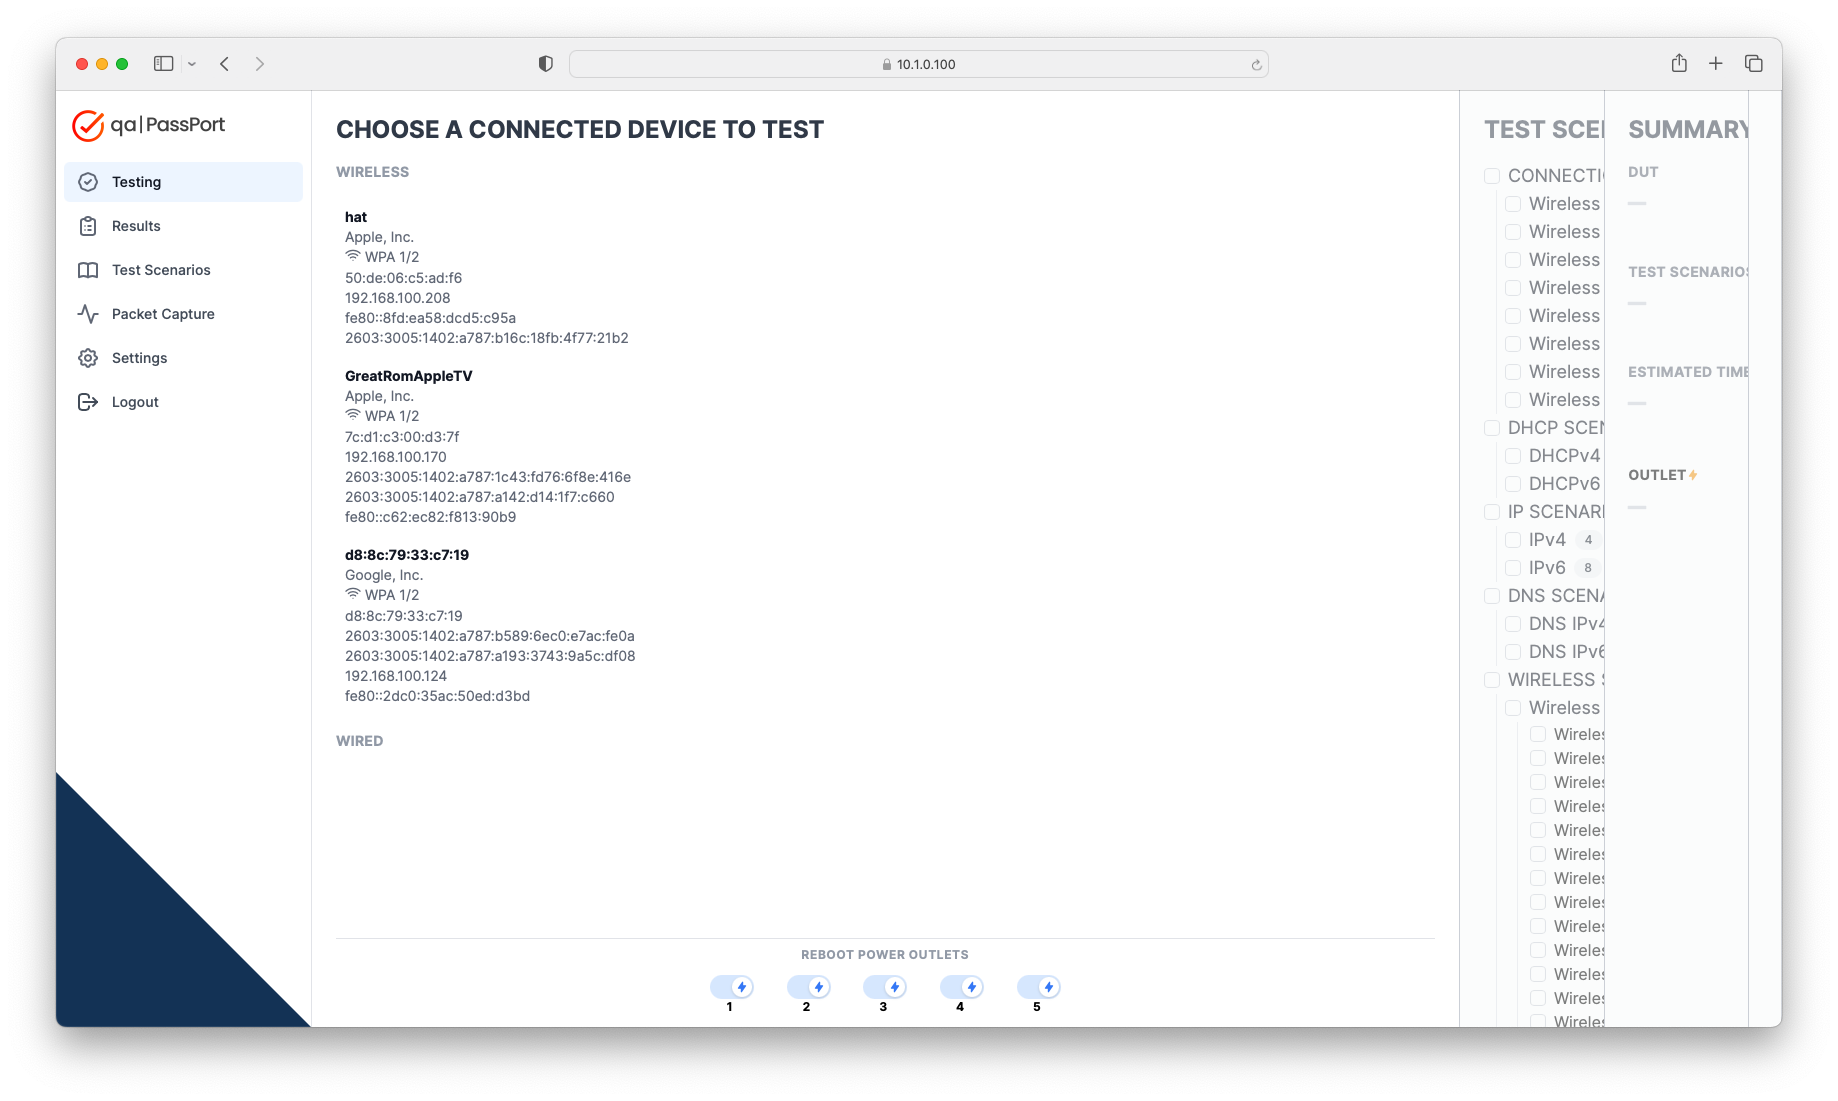
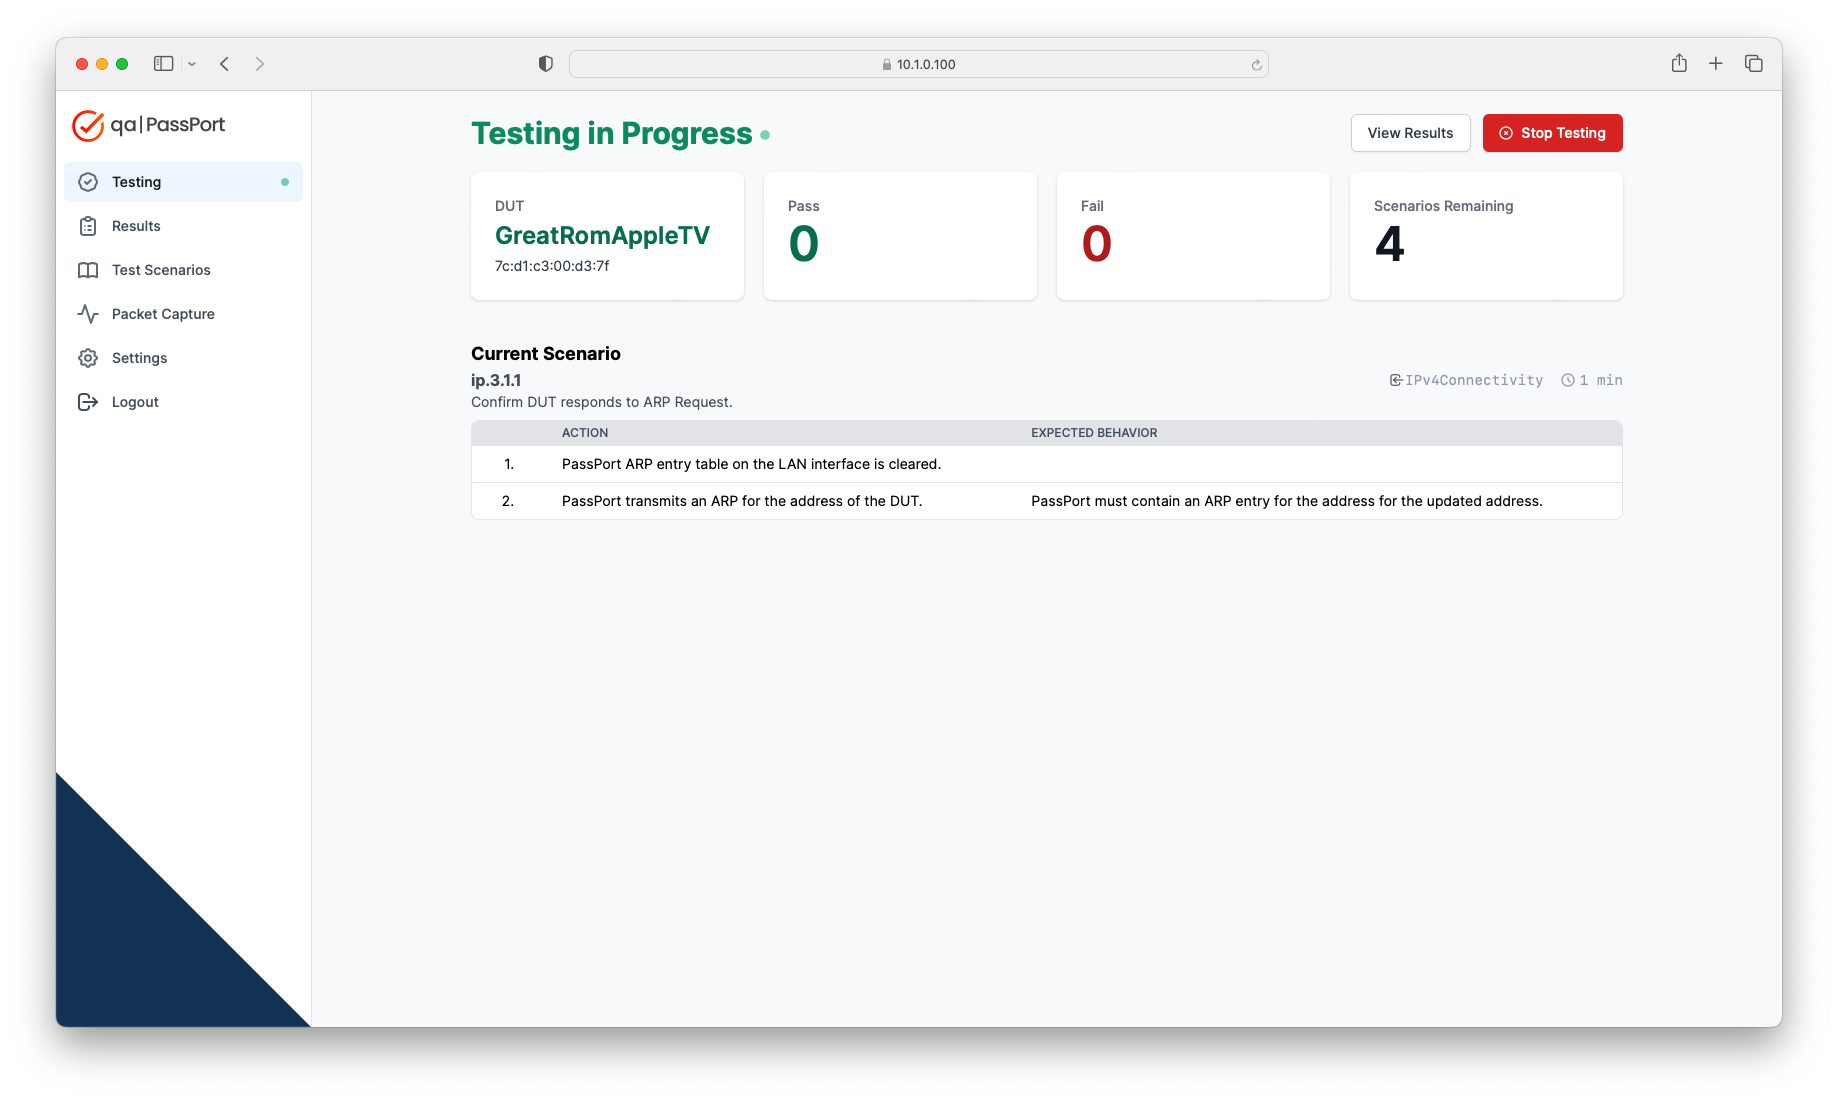
5. Select and run tests
- Go to the Testing page an choose a connected device to test. All devices that been connected to PassPort will appear here.
- Select the test scenarios to run from the list. Note that the time estimates for each test are provided. As test are added the
total test duration will be displayed.
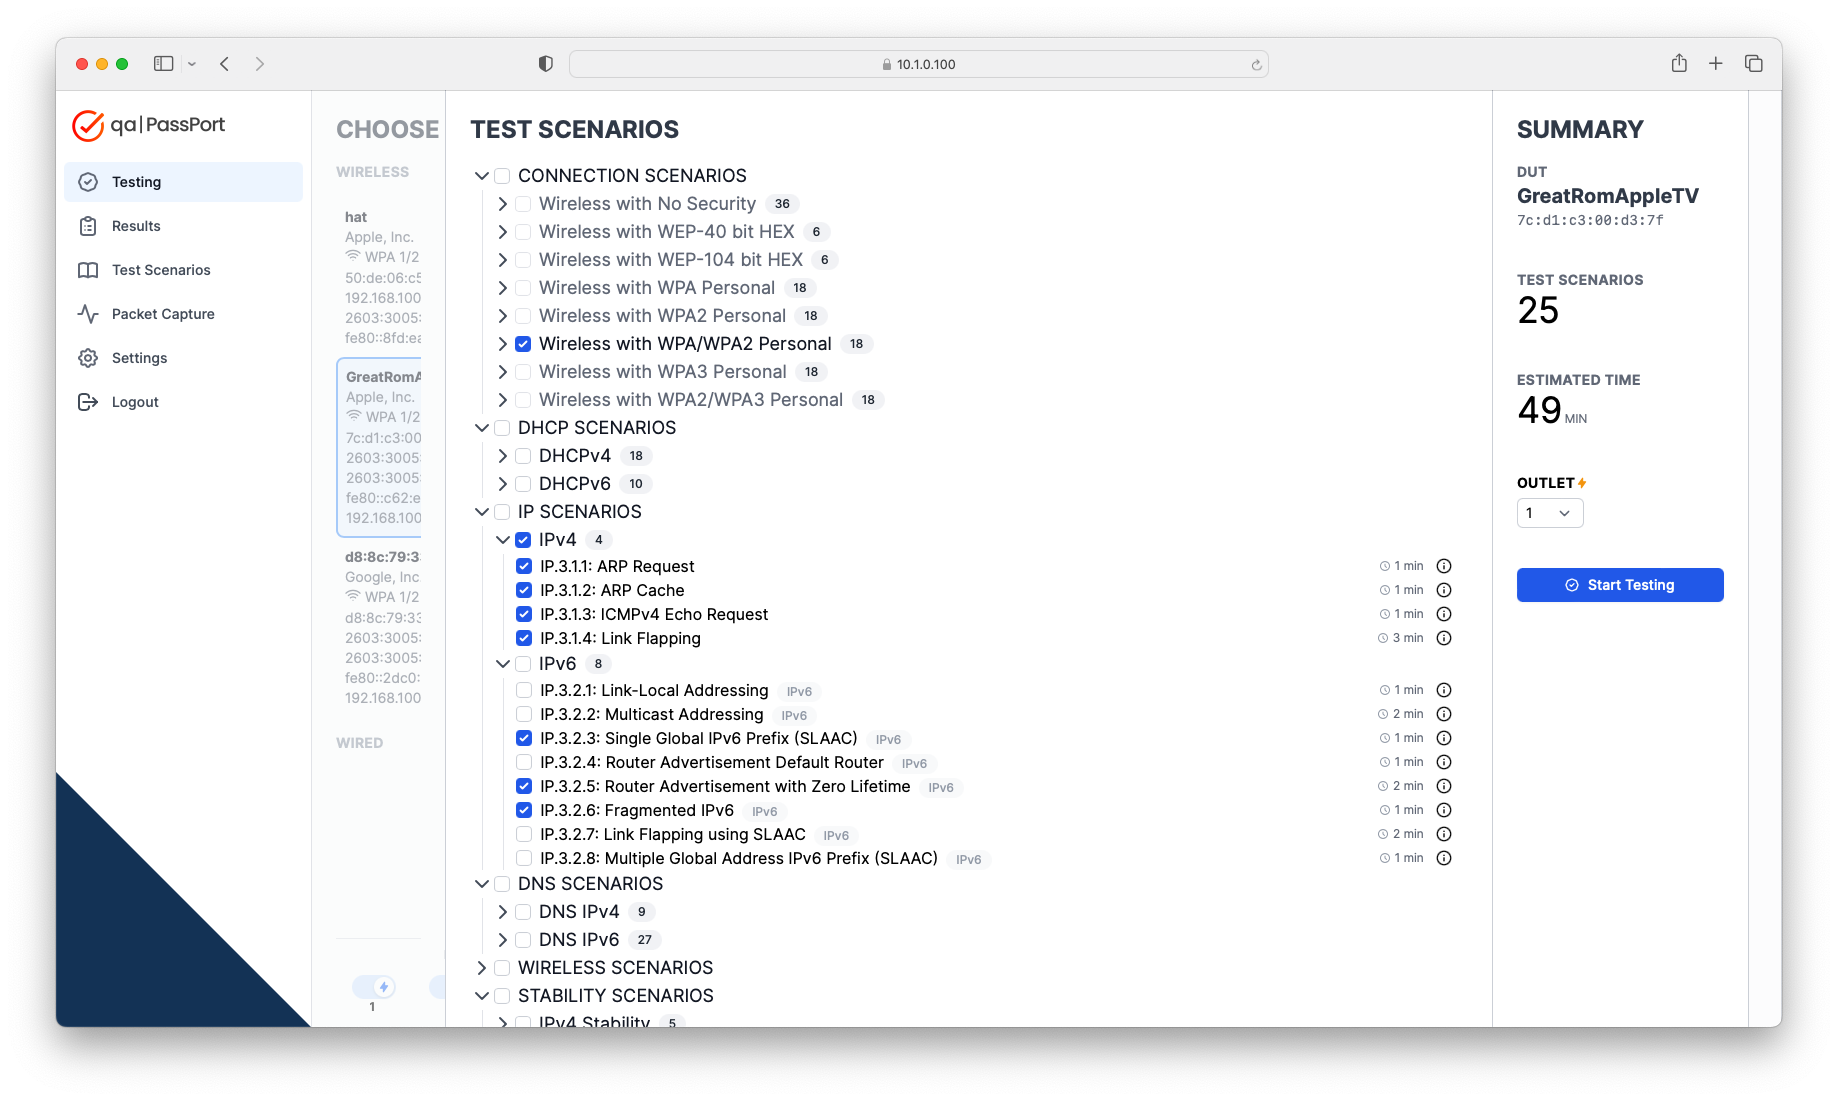
- From the OUTLET drop-down menu, select the power outlet on the Synaccess NP-02 that the DUT is plugged into. this outlet will be remembered the next time this device is chosen.
- Click the Start Testing button.
- The Testing page will automatically update while tests are running. The number of test that have passed, failed and are
pending will displayed. The Stop Testing button can be used to stop all current testing.
6. Review test results
- Go the Results page on the sidebar.
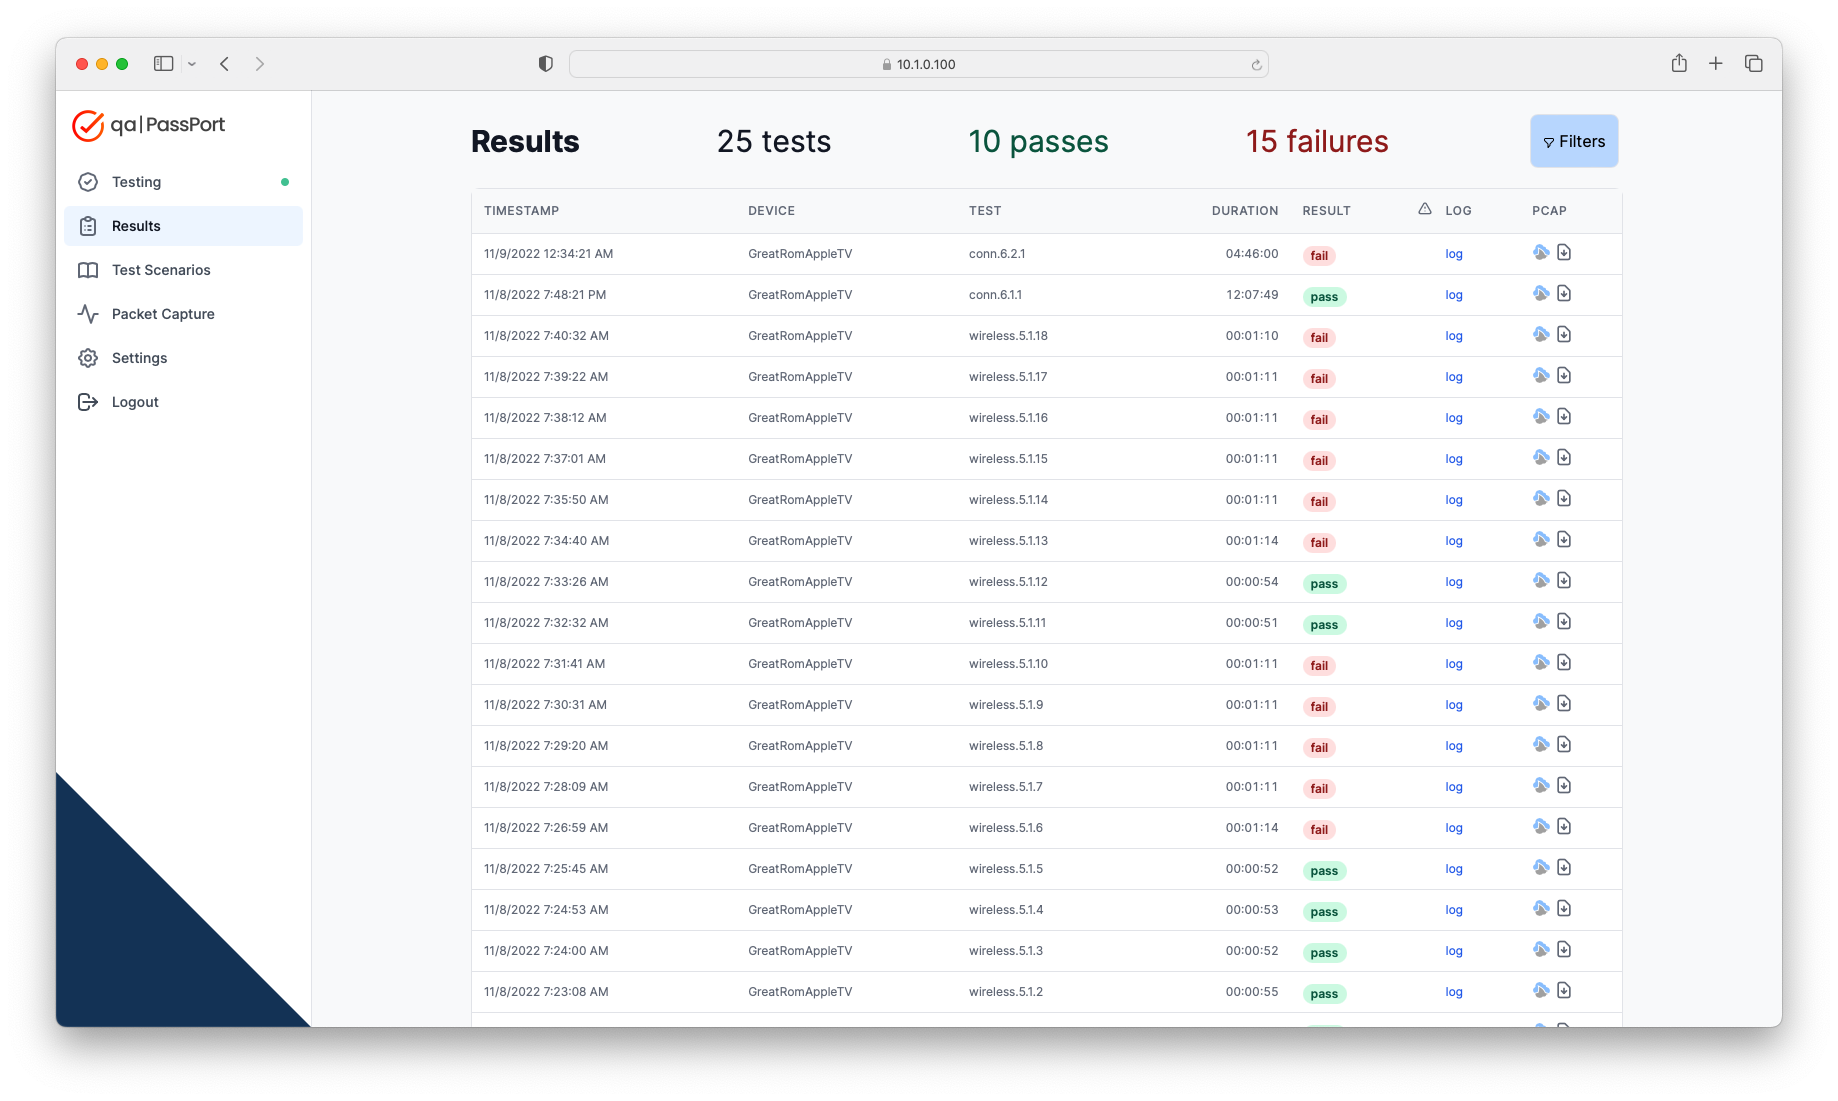
- Results are displayed in chronological order by default. They can be filtered using the button in upper right corner.
- A log file and a capture file are provided for each result.
- Log files contain status and pass / fail messages that are useful for debugging failures.
- Capture files contain all of the network traffic between the DUT and PassPort during the test.
- Capture files may be downloaded or viewed directly in a web browser by clicking the CloudShark icon.
- CloudShark is a powerful SaaS network analysis solution developed by QA Cafe. All PassPort systems include and are pre-configured with a CloudShark account.
- Clicking on a CloudShark icon will push network traffic captures by PassPort to the cloud.
- A description of each test can be found on the Test Scenarios page.
Upgrading PassPort
- Go to the Settings page on the sidebar.
- Locate the Software & License Update box.
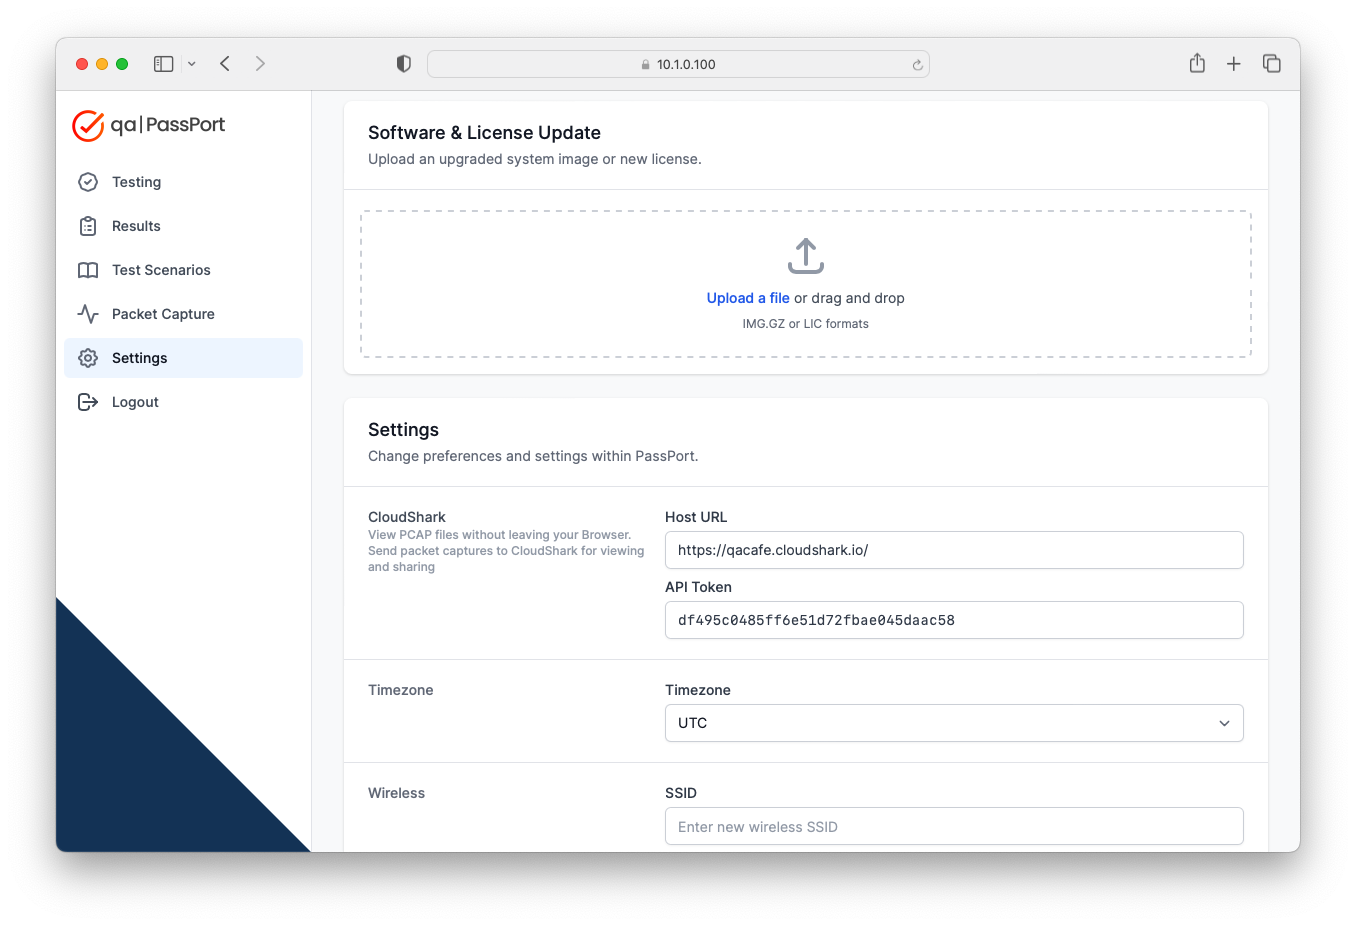
- Click
Upload a fileor drag and drop the passport-X.Y.Z.img.gz file. - PassPort will reboot once the upload is complete.
- To verify the update, login back into PassPort to confirm the system image version on the Settings page.
Requesting Support
Have questions? Always feel free to contact us directly via email at support@qacafe.com for setup assistance or questions about the test scenarios and technologies that PassPort covers.