Synaccess SynLink PDU
Overview
In order to properly evaluate the behavior of a device under test (DUT), it is often beneficial to be able to automatically power on, power off, and reboot the DUT. A remote power distribution unit (PDU) is the solution. These devices allow individual outlets to be controlled programmatically over a network or USB connection. QA Cafe has been using remote PDUs from Synaccess Networks in its own lab environment for many years. These devices come in several configurations, ranging from 2 to 16 or more outlets.
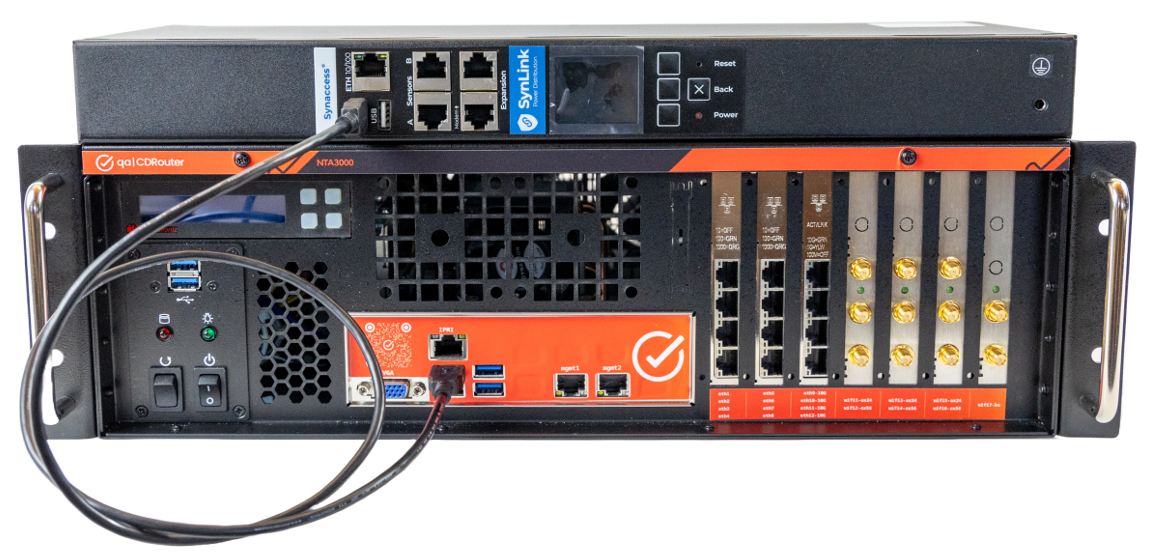
The Synaccess SynLink PDU SP-1001AIE-02 is a 1U rack mountable power distribution unit that provides remote programmatic control of its outlets. It’s the model that QA Cafe currently offers as part of its Advanced Accessory Pack, an option when purchasing an NTA3000. A DUT that is plugged into this system can be powered on and off through various means, including a simple script included with CDRouter. This allows a DUT to be powered on or rebooted at the start of a test run and powered off at the end of a test run, for example.
The Synaccess SynLink PDU has an IEC320 C20 power inlet, 120V/208V/240V, up to 20A. And it comes with eight IEC320 C13 outlets, allowing up to eight DUTs to be plugged in and controlled individually.


Web UI Configuration
The Synaccess SynLink PDU provides a comprehensive web UI for controlling the outlets, displaying status information, and for configuration. To access the web UI, the unit must be connected to an ethernet network. Plug an ethernet cable into the ETH 10/100 port. The LCD screen on the front will display the IP address. By default it’s a static IP:
192.168.1.100
If desired, this can be changed to a different static IP or to a DHCP address by using the LCD and keypad menus or by configuring it in the web UI.
On another system, pull up a web browser and go to the IP address displayed on the LCD. You will be prompted to log in. The default credentials are:
Username: admin
Password: admin
You will be prompted to change the admin password or skip this step. Either option is fine.
Note: Should you ever have to reset the Synaccess SynLink PDU back to factory defaults, you can do this by navigating to the “Settings” page on the left and then to the “Reset and Restart” tab at the top, and finally clicking on the “Reset All Settings” button. If you’ve changed and forgotten login credentials and cannot log in, you can perform a factory reset via the LCD keypad. Simply press and hold the top and bottom button (in the column of three) for 10 seconds or so until the LCD goes blank. Keep in mind resetting to factory defaults will reset the IP address to 192.168.1.100 and reset the admin password and all other configuration parameters.
Connect to the NTA3000 via USB Cable
The simplest and most direct means to connect the Synaccess SynLink PDU to the NTA3000 is over a serial connection using the provided USB cable. The USB cable must be connected to the port labeled “COM” on the Synaccess. Any available USB port on the NTA3000 is fine.
For the serial connection to work, auto login on the serial connection must be enabled. This can be done in the web UI by navigating to the “Settings” page on the left and then to the “Ports” tab at the top. Set “Enable Auto Login on Serial COM”, then click the “Save” button.
Connect to the NTA3000 over Ethernet
The Synaccess SynLink PDU and the NTA3000 can communicate over an ethernet network using either http(s) or telnet. If you need to change the IP configuration of the Synaccess SynLink PDU, this can be done via the front panel LCD screen and keypad. It can also be done in the web UI by navigating to the “Network” page on the left and then to the “IP” tab at the top. Click the “Save” button after making changes. If you change the IP configuration from the web UI, you might loose communication with the web UI once you click the “Save” button.
Changing the Synaccess SynLink PDU to use DHCP and connecting it to the same network as the NTA3000 mgmt1 interface is one approach. Another approach is to simply connect the Synaccess SynLink PDU directly to the mgmt2 interface of the NTA3000, no ethernet switch required. This approach requires changing either the static IP address of the Synaccess SynLink PDU or the static IP address of the NTA3000 mgmt2 interface so that both are on the same network. To change the IP address of the mgmt2 interface, refer to these instructions.
For http(s) to work, the http and/or https webserver on the Synaccess SynLink PDU must be enabled. This can be done in the web UI by navigating to the “Network” page on the left and then to the “Web” tab at the top. Set “Enable HTTP Webserver” and/or “Enable HTTPS Webserver as well as “Password Access (HTTP(S) Basic Authentication), then click the “Save” button.
For telnet to work, the telnet server on the Synaccess SynLink PDU must be enabled. This can be done in the web UI by navigating to the “Network” page on the left and then to the “Telnet” tab at the top. Set “Enable Telnet Server”, then click the “Save” button.
Running the cdrouter-power command
CDRouter 14.4 or newer comes with a script that can be used to simplify the communication between the NTA3000 and the Synaccess SynLink PDU. The same command can be used regardless of how the two systems are connected (serial, http(s), telnet). To try out the script and test communication, pull up a terminal window on the NTA3000. This can be done either by connecting remotely via ssh, or by hooking up a monitor/keyboard/mouse to the NTA3000. As the root user, run the following command to see how the script works:
/usr/cdrouter/bin/cdrouter-power -help
Here are a few examples of common usage:
To turn on outlet #3:
/usr/cdrouter/bin/cdrouter-power -on 3
To turn off outlet #5:
/usr/cdrouter/bin/cdrouter-power -off 5
To reboot outlet #6:
/usr/cdrouter/bin/cdrouter-power -reboot 6
To see the status of all outlets:
/usr/cdrouter/bin/cdrouter-power -status
cdrouter-power communication methods
By default, cdrouter-power will attempt a serial connection. If an http(s) or telnet connection is needed, the -url parameter must be used. Here are some examples of that:
/usr/cdrouter/bin/cdrouter-power -url http://admin:admin@10.0.1.8 -on 5
/usr/cdrouter/bin/cdrouter-power -url telnet://10.0.1.8 -on 5
Controlling a DUT during a CDRouter test run
Incorporating this functionality into a test run is simply a case of setting the appropriate testvars in the CDRouter configuration. Take the example of a DUT connected to outlet #4. It will be rebooted at the start of the test run, allowed 30 seconds to boot, and powered off at the end if the following testvars are set as shown:
testvar RestartDut		"cdrouter-power -reboot 4"
testvar RestarDutDelay		30
testvar ShutdownDut		"cdrouter-power -off 4"
See documentation for RestartDut, RestartDutDelay, and ShutdownDut
for more information.
The Devices page in CDRouter can also make use of this functionality. The Power On Command and Power Off Command could be something like the following.
Power On Command
cdrouter-power -on 6
Power Off Command
cdrouter-power -off 6
Other methods of communication
The cdrouter-power command is a convenient way for the NTA3000 to communicate with the Synaccess SynLink PDU. Other methods will work as well. For example, you could write your own expect script to control a telnet session, written in the language of your choice. The wget command could be used to send commands as well.