CDRouter TR-069 User Guide
Introduction
CDRouter TR-069 Expansion for CDRouter
CDRouter TR-069 adds TR-069 testing and functionality to our industry leading CPE and router test platform, CDRouter. CDRouter TR-069 has been designed from the ground up to work with implementations based on the Broadband Forum’s CPE WAN Management Protocol described by Technical Report 69 (TR-069). CDRouter TR-069 currently supports TR-069 Amendments 1-6.
The TR-069 specification and related documents can be found on the Broadband Forum website.
With the CDRouter TR-069 expansion module enabled, CDRouter is enhanced to provide a built-in ACS during all testing sessions. The CDRouter TR-069 expansion module also contains several new test modules focusing on three major areas of TR-069 testing:
-
Fully automated Broadband Forum specification testing:
Test Module Description od128.tcl Interoperability Test Plan for TR-069 Plugfests ir181.tcl CWMP Interoperability and Functionality Test Plan tr143_http.tcl TR-143 tests for performance diagnostics using HTTP -
Real-world testing that addresses functionality not currently covered in OD-128:
Test Module Description tr69.tcl Additional TR-069 testing of the CPE device (beyond OD-128) tr69_conn_req.tcl TR-069 tests for TCP Connection Requests tr69_wireless.tcl TR-069 tests for wifi interfaces tr111_part1.tcl TR-111 Part 1 tests for device-gateway association tr111_part2.tcl TR-111 Part 2 tests for connection request via NAT gateway -
CWMP data model profile verification testing for all Broadband Forum defined root data models and user-defined data models.
Test Module Description InternetGatewayDevice1_profiles.tcl TR-098 CWMP profile testing for IGD:1 root data model Device1_profiles.tcl TR-106 CWMP profile testing for Device:1 root data model Device2_profiles.tcl TR-181 Issue 2 CWMP profile testing for Device:2 root data model cwmp_scenarios.tcl General CWMP configuration testing for user defined CWMP scenarios cwmp_profiles.tcl General CWMP profile testing for user defined CWMP Profiles
By offering automated versions of the OD-128 test cases in addition to the growing battery of real-world and data model profile tests, CDRouter TR-069 can help you test your TR-069 device quickly and thoroughly.
CDRouter TR-069 Extended Data Model Expansion (TR69-EDM)
The Extended Data Model expansion for CDRouter TR-069 (TR69-EDM) provides support for testing the profiles defined in the Broadband Forum’s service data models. The TR69-EDM expansion is only available on systems that already have CDRouter and the CDRouter TR-069 expansion installed.
TR69-EDM provides support for the profiles defined in Broadband Forum TR-104, TR-135, TR-140, and TR-196. The following test modules are included with the TR69-EDM expansion:
| Test Module | Description |
|---|---|
| VoiceService1_profiles.tcl | TR-104 CWMP profile testing for VoiceService:1 data model |
| VoiceService2_profiles.tcl | TR-104 Issue 2 CWMP profile testing for VoiceService:2 data model |
| STBService1_profiles.tcl | TR-135 CWMP profile testing for STBService:1 data model |
| StorageService1_profiles.tcl | TR-140 CWMP profile testing for StorageService:1 data model |
| FAPService1_profiles.tcl | TR-196 CWMP profile testing for FAPService:1 data model |
| FAPService2_profiles.tcl | TR-196 Issue 2 CWMP profile testing for FAPService:2 data model |
Test Methodology
Initial Setup
CDRouter TR-069 provides a built-in ACS for CPEs to communicate with. Prior to running any TR-069 tests, the CPE must be told how to connect to the ACS.
Information on how to configure CDRouter TR-069’s ACS can be found in the Configuration section below.
See the Configuring the CPE for TR-069 section to ensure the CPE’s ACS URL and username/password settings match the ACS configuration.
Start-Up
During the start-up procedure, CDRouter TR-069 expects to receive an Inform RPC from the device being tested. This Inform should be triggered by rebooting the device, or by configuring the CPE Connection Request URL in the CDRouter configuration file. Once CDRouter has received the initial Inform, the testing procedure will begin.
Requirements and License
In order to run the CDRouter TR-069 or TR69-EDM expansions, your license file must be updated to enable the CDRouter TR-069 functionality. Note that the TR69-EDM expansion requires the CDRouter TR-069. Please follow the instructions from support@qacafe.com on updating your license file to enable CDRouter TR-069 and TR69-EDM (if applicable).
CDRouter will report the status of all available expansions during the installation
process and during startup. To verify that the CDRouter TR-069 or TR69-EDM add-
ons are enabled on your system, execute the command cdrouter-cli -info as root
and look for the lines “TR69 is enabled” and “TR69-EDM is enabled”. If these
lines are present, the CDRouter TR-069 and TR69-EDM expansions are enabled and
ready to use.
$ cdrouter-cli -info

Starting /usr/cdrouter/bin/cdrouter-cli Thu Feb 13 11:24:21 EST 2020
Copyright (c) 2001-2020 by QA Cafe
Version 11.8.1 (3e14431), built 2020-01-21 17:36:00 by build@cdr-forge6.lan (x86_64)
OS: CentOS Linux 7.7.1908 (4.19.86-20191127.157965373585.el7.qacafe.x86_64)
CPU: Intel(R) Core(TM) i7-4790S CPU @ 3.20GHz
Loaded modules from: '/usr/cdrouter/tests'
Start command: /usr/cdrouter/bin/cdrouter-cli -info
System ID: 0ac36dcfd8170d83c15cd1da8b37d068
Registered to: qacafe
License type: Perpetual
Maintenance, support and upgrades until: 2020-10-27
Test suite: cdrouter
    Multiport   is enabled
    IPv6        is enabled
    Storage     is enabled
    IKE         is enabled
    TR69        is enabled      <----
    TR69-EDM    is enabled      <----
    Nmap        is enabled
    BBF.069     is enabled
    SNMP        is enabled
    Performance is enabled
    ICS         is enabled
    DOCSIS      is disabled
    USP         is disabled
NTA1000 serial number: NTA1000-10513
NTA1000 platform: v5
NTA1000 image: 7.0.8
Configuration
Enabling the ACS
In order to run CDRouter TR-069 tests, the ACS server must be enabled in your
CDRouter configuration file. This is done by setting supportsCWMP
to “yes”.
testvar supportsCWMP yes
The ACS address is specified by setting the acsIp testvar to either
an IPv4 or IPv6 address.
testvar acsIp 6.0.0.1
    -or-
testvar acsIp 6000::1
The ACS may run with both IPv4 and IPv6 at the same time by setting the
acsDualStackIp testvar to a secondary address. When both
testvars are set, each address must be in a different address family.
testvar acsIp 6000::1
testvar acsDualStackIp 6.0.0.1
The CPE configuration must be updated to reach the ACS at one of these addresses or a fully-qualified domain name that resolves to one of these addresses.
ACS Domain Name
The fully-qualified domain name (FQDN) of the ACS is specified by the
acsDomain testvar, which defaults to acs.cdroutertest.com.
NOTE: In CDRouter 11.8 the default ACS domain name and TLS certificates were changed from acs.qacafe.com to acs.cdroutertest.com. Please see the “Updating the TR-069 ACS Domain Name” article in the Knowledge Base for instructions to update your configuration with the new domain name.
Any existing CPE settings and configurations must be updated to use the new domain name when upgrading to CDRouter 8.1 in order to successfully connect to the ACS.
CDRouter’s DNS server will automatically resolve ‘A’ and ‘AAAA’ record
requests for this FQDN to the ACS’s IPv4 or IPv6 address, respectively.
You may set a custom ACS domain name in DNS by modifying the acsDomain
testvar. Additional domain name mappings may be added to
CDRouter using the dnsHostname/dnsIp
testvar pairs if desired.
By default, when CDRouter’s ACS is enabled it runs over HTTP on TCP Port 80 with the following settings:
testvar acsTransport            http
testvar acsPort                 80
testvar acsDomain               acs.cdroutertest.com
testvar acsAuth                 digest
testvar acsDigestQopAuth        yes
testvar acsInterface            wan
testvar acsWaitForInform        120
testvar acsSkipInitialInform    no
testvar cwmpProtocolVersion     1.0
testvar acsDeviceDiscovery      no
testvar acsDefaultUser          qacafe
testvar acsDefaultPassword      qacafe123
testvar acsCpeDefaultUser       qacafe
testvar acsCpeDefaultPassword   qacafe123
The acsTransport testvar specifies the type of connection
(HTTP or HTTPS) the ACS will use for CWMP sessions with the CPE. The acsPort
is the TCP port the ACS will listen on.
All connections from the CPE must be authenticated using the acsDefaultUser
and acsDefaultPassword testvars below.
The CPE must be configured with the same username and password in order
to successfully authenticate with the ACS.
testvar acsDefaultUser          qacafe
testvar acsDefaultPassword      qacafe123
The acsCpeDefaultUser and acsCpeDefaultPassword
testvars are used by the ACS when initiating
Connection Requests with the DUT. Some CPE devices do not allow these
credentials to be set by the user, and instead rely on the ACS itself
to configure them. See the acsDeviceDiscovery testvar
for more details.
testvar acsCpeDefaultUser       qacafe
testvar acsCpeDefaultPassword   qacafe123
See the Configuring the CPE for TR-069 section to ensure the CPE configuration matches CDRouter’s ACS settings.
Configuring ACS to use HTTPS with SSL/TLS certificates
The ACS can be configured to run over HTTPS using SSL or TLS certificates by
setting acsTransport to https. The following settings
provide a typical HTTPS setup using the TCP well-known port 443, but any port may be
specified.
testvar acsTransport            https
testvar acsPort                 443
testvar acsDomain               acs.cdroutertest.com
testvar acsSslVersion           tls
testvar acsCertPath             /usr/cdrouter/tests/acs.cdroutertest.com.pem
testvar acsCaCertPath           /usr/cdrouter/tests/acs.cdroutertest.com-ca.pem
When configuring your DUT, be sure to set the ACS URL with a
properly-formatted URL that begins with “https://” and includes the fully
qualified domain name (FQDN) of the ACS. The FQDN must match Common Name
(CN) field contained in the ACS certificate (acsCertPath).
CDRouter’s default ACS certificate –
/usr/cdrouter/tests/acs.cdroutertest.com.pem – has a FQDN of
acs.cdroutertest.com. If you
configure the ACS to use a different certificate, be sure to update the acsDomain
testvar to match the FQDN specified in the CN field of
the ACS server certificate or else the DUT may not be able to validate the
certificate.
By default acsSslVersion is set to tls which is
recommended to allow the ACS to automatically adjust to the version supported by
the CPE. Other values are supported in order to force the ACS to operate at a
specific version. See the acsSslVersion testvar definition below
for more details.
The acsCertPath testvar specifies the location of the
certificate that the ACS will send to the CPE when establishing a TLS/SSL
connection. The file must contain both of the following:
- The ACS certificate in PEM format (plain text)
- The private key, which must be unencrypted
The acsCaCertPath testvar is used if the ACS certificate
requires one or more additional certificates from an Intermediate Certificate
Authority (CA) in order for the CPE to valid it. This testvar specifies a file
containing all intermediate CA certificates, which the ACS will send to the CPE
along with the ACS certificate.
Using CDRouter’s Default ACS Certificate
CDRouter provides several different certificate/key pairs for various
types of TLS/SSL connections in the /usr/cdrouter/tests directory.
In CDRouter’s default configuration, the acs.cdroutertest.com.pem and
acs.cdroutertest.com-ca.pem files are used.
-
The
acs.cdroutertest.com.pemfile contains the default ACS certificate, which has been signed by Sectigo/Comodo and should be accepted by most CPE devices. -
The
acs.cdroutertest.com-ca.pemfile contains the Intermediate CA certificates from Sectigo/Comodo that are needed to validate the ACS server certificate.
When validating the ACS certificate, the CPE must have the Sectigo/Comodo Root CA certificate pre-installed in its local store of trusted certificates. Otherwise, it will reject the ACS certificate and the TLS/SSL connection will not be established.
If this happens, the Sectigo/Comodo Root CA certificate must somehow be imported into the CPE’s trusted certificate store. The procedure for doing this will depend on the type of CPE device and may or may not be supported. You can find more help on this in the following article in the QA Cafe Knowledge Base: What root certificate must be installed to verify acs.cdroutertest.com.pem?
Using Custom/Proprietary Certificates
You may also have the ACS use your own custom certificate for SSL/TLS
connections, simply by copying both the certificate and its associated
private key (unencrypted) into a file on your CDRouter system.
Then set the acsCertPath testvar to the full path name
of that file. If the CPE will require one or more certificates from
Intermediate CA’s, these should all be copied into a single file on the
CDRouter system as well, and the acsCaCertPath testvar
should be updated to point to it.
testvar acsCertPath            /usr/cdrouter-data/custom/MyPrivateACSCert.pem
testvar acsCaCertPath          /usr/cdrouter-data/custom/MyPrivateCA-Certs.pem
Remember that the ACS certificate file must contain both the certificate data in PEM format and the unencrypted private key associated with it, as described in the previous sections.
Filtering sessions by device serial number and OUI
CDRouter’s ACS can be configured to filter incoming CWMP sessions by device serial number and OUI. When enabled, the ACS will only respond to incoming CWMP traffic from the configured device. All incoming CWMP sessions from other devices will be ignored.
This feature allows CDRouter’s ACS to work better in environments where
multiple devices are active and sending CWMP traffic to the ACS. To utilize
this feature, the testvars tr69DeviceSn and tr69DeviceOui
must be enabled and properly set to the values of the
OUI and SerialNumber reported by the DUT in the DeviceId portion of
its Inform messages.
testvar tr69DeviceSn       307087685
testvar tr69DeviceOui      000271
ACS testvar settings
The ACS has several configuration options to control its behavior and various aspects of the test setup.
Basic ACS Configuration
The following list describes all basic ACS configuration testvars.
acsPortacsTransportacsAuthacsDigestQopAuthacsInterfaceacsDiscoveryUrlacsWaitForInformacsSkipInitialInformacsCpeConnReqURLcwmpProtocolVersionacsDeviceDiscoveryacsConfigurePeriodicInformtr69InitiateConnectionacsDefaultUseracsDefaultPasswordacsCpeDefaultUseracsCpeDefaultPassword
Advanced ACS Configuration
There are also several advanced configurations options for the ACS which are listed here.
acsCpeKeepAliveacsChunkedEncodingacsChunkSizeacsAuthOncePerSessionacsCookieModeacsCpeConnReqURLMappedacsNumberCpeAttemptsacsDelayCpeAttemptsacsWaitForConnectionRequestacsUseTcpOffloadacsTargetDeviceacsDualStackIp
ACS SSL Configuration
The following configuration options can be used to enable SSL on the ACS.
TR-069 Profile Configuration
The following configuration options are used when testing TR-069 profiles.
Custom CWMP Profiles
Custom TR-069 profiles can also be defined and tested with CDRouter TR-069. The following configuration options are used to define custom TR-069 profiles. Each custom profile must be defined as a separate testvar_group in the configuration file.
Additional/Optional TR-069 Configuration
The following list of configuration options can be used to fine tune the test setup and provide additional information that will be used in certain test cases.
tr69DeviceTypetr69InformTimeouttr69MinPeriodicInformtr69ScheduleInformRPCtr69UploadRPCtr69UploadPathtr69ConfigUploadFilenametr69LogUploadFilenametr69FactoryResetRPCtr69CpeGetRPCstr69ForceBooleantr69XMLCapturePathtr69DownloadTimeouttr69DownloadImagetr69DownloadOriginalImagetr69RebootTimeouttr69RpcTimeouttr69DownloadConfigtr69MaxUserNameLentr69MaxPasswordLentr69MaxCpeUserNameLentr69MaxCpePasswordLentr69DUInstallImagetr69DUInstallUUIDtr69DUChangeTimeouttr69DUChangeExecEnvReftr69WildcardPortMappingOnlytr69PortMapDeletionDelaytr69TraceRouteTimeoutsupportsTr111Part1cwmpScenarioPathcwmpScenarioSingleModecwmpScenarioBootstrap
TR-111 Part 2 Configuration
If the CPE supports TR-111 Part 2, the following configuration options will enable this capability within CDRouter.
supportsTr111Part2STUNMaximumKeepAlivePeriodSTUNMinimumKeepAlivePeriodSTUNAuthacsUdpConnectionDelay
Configuring the CPE for TR-069
The CPE’s TR-069 settings must match the ACS configuration, as described in the previous sections.
Prior to running any TR-069 tests, the CPE must be told how to connect
to the ACS. This may be done by statically configuring the CPE with an
“ACS URL” that specifies the ACS IP address or its fully-qualified domain
name, acs.cdroutertest.com, as well as the port number and transport method
(HTTP or HTTPS) used by the ACS. These are specified by the acsIp,
acsPort and acsTransport
testvars in your CDRouter config file.
The CPE must also provide the correct username and password in order
to successfully authenticate with the ACS. These are specified by the
acsDefaultUser and acsDefaultPassword testvars.
Example CPE settings for CDRouter’s default ACS configuration might look like this:
ACS URL: http://acs.cdroutertest.com:80
Username: qacafe
Password: qacafe123
ACS Discovery via DHCP
The CPE may also learn the ACS URL dynamically via DHCP or DHCPv6. CDRouter supports ACS discovery as outlined in Section 3.1 of TR-069 Amendment 6 from the Broadband Forum.
This feature is enabled by default when TR-069 is enabled. When CDRouter’s DHCP server receives a client request containing the Vendor Class option 60 (RFC 2132) or the V-I Vendor Class option 124 (RFC 3925) with the value ‘dslforum.org’, the DHCP server will include DHCP Vendor Specific Information option 43 or 125, respectively, in the response indicating the location of the ACS server. This feature is also supported using DHCPv6 Vendor Class option 16 and DHCPv6 Vendor Specific Information option 17 (RFC 8415).
The DHCP server will automatically construct the ACS URL to send
to the CPE based on the values of the acsTransport, acsIp
and acsPort testvars.
Example:
testvar acsTransport  https
testvar acsIp         6.5.4.3
testvar acsPort       7547

URL of ACS => https://6.5.4.3:7547/
You may also set the ACS URL to a specific value. This may be required when using DNS names or HTTPS transport for your ACS connections.
Examples:
testvar acsDiscoveryUrl https://acs.cdroutertest.com:7547/
testvar acsDiscoveryUrl http://6.0.0.1:80
Note that when specifying URLs containing literal IPv6 addresses, you must enclose the IPv6 address in square brackets, as specified in RFC 3986. If such URLs are used within a testvar, the square brackets must be escaped appropriately using one of the methods below:
testvar acsDiscoveryUrl http://\[6000::1\]:80/
testvar acsDiscoveryUrl {http:/[6000::1]:80/}
ACS Discovery may be turned off by setting the testvar acsDiscoveryUrl
to none. For example:
testvar acsDiscoveryUrl none
Example Configurations
CDRouter TR-069 Basic Configuration
In the example below, CDRouter is configured with the CPE Connection Request URL so that it can initiate new TR-069 sessions from the start. The CPE Connection Request username and password are statically configured on the CPE and the CPE is also configured with the username and password of the ACS.
testvar supportsCWMP                yes
testvar acsIp                       6.0.0.1
testvar acsPort                     80
testvar acsTransport                http
testvar acsAuth                     digest
testvar acsDigestQopAuth            yes
testvar acsCpeConnReqURL            http://192.168.200.2:80/XML/000FCC-23570008.xml
testvar acsDeviceDiscovery          no
testvar acsDefaultUser              000FCC-23570008
testvar acsDefaultPassword          acs123
testvar acsCpeDefaultUser           cpeurl
testvar acsCpeDefaultPassword       cpe123
testvar tr69InitiateConnection      yes
testvar tr69DownloadImage           /usr/cdrouter-data/custom/fw_image_ver2.bin
CDRouter TR-069 Configuration with Device Discovery
In the example below, CDRouter is configured to use device discovery by
configuring testvar acsDeviceDiscovery to yes. When the first
Inform is received from the DUT, CDRouter will attempt to configure the
Connection Request username and password on the device, and will disable the sending of
Periodic Informs to the ACS.
testvar supportsCWMP                yes
testvar acsIp                       6.0.0.1
testvar acsPort                     80
testvar acsTransport                http
testvar acsAuth                     digest
testvar acsDigestQopAuth            yes
testvar acsWaitForInform            120
testvar acsDeviceDiscovery          yes
testvar acsDefaultUser              000FCC-23570008
testvar acsDefaultPassword          acs123
testvar acsCpeDefaultUser           cpeurl
testvar acsCpeDefaultPassword       cpe123
testvar tr69InitiateConnection      yes
testvar tr69DownloadImage           /usr/cdrouter-data/custom/fw_image_ver2.bin
Download and Upload Testing
Some tests in the CDRouter TR-069 expansion verify file transfers initiated
through Download and Upload RPC requests from the ACS.
To successfully run Download and Upload tests, the following testvars must be configured to specify the location of firmware images and other parameters. Firmware images are specified as the full path to a valid file that has been copied to the CDRouter system and that is a valid firmware image for the CPE being tested.
testvar tr69UploadRPC                    no
testvar tr69UploadPath                   /tmp
testvar tr69ConfigUploadFilename         vendor_configuration_file
testvar tr69LogUploadFilename            vendor_log_file
testvar tr69DownloadImage                /path/to/image
testvar tr69DownloadImageVersion         1.0
testvar tr69DownloadOriginalImage        /path/to/original_image
testvar tr69DownloadTimeout              600
CDRouter will dynamically create an HTTP file server to handle all
file transfers from the DUT. The same testvars used to configure the
address family, transport settings and authentication settings of the
ACS will also be applied to the file server. For example, if acsTransport
is “https” and acsIp is an IPv6 address,
then the file server will also use HTTPS and IPv6.
testvar acsPort                     80
testvar acsTransport                http
testvar acsAuth                     digest
testvar acsDigestQopAuth            yes
The following testvars can be used to configure the unique authentication username and password and TLS/SSL certificates for the file server:
testvar acsFileServerUser                file_server_user
testvar acsFileServerPassword            file_server_password
testvar acsDownloadCertPath              /usr/cdrouter/tests/acs-download.cdroutertest.com.pem
testvar acsDownloadCaCertPath            /usr/cdrouter/tests/acs.cdroutertest.com-ca.pem
TR-111 Parts 1 and 2
CDRouter TR-069 supports TR-111 Parts 1 and 2. By default, support for TR-111 Part 1 and 2 is disabled.
NOTE: TR-111 Parts 1 and 2 have been incorporated into the TR-069 specification as Annexes F and G, respectively, starting with TR-069 Amendment 1. This functionality (as defined in Annexes F and G of TR-069 Amendment 1+) is referenced as TR-111 Part 1 and TR-111 Part 2 within CDRouter TR-069.
TR-111 Part 1 (TR-069 Annex F: Device-Gateway Association)
Support for TR-111 Part 1 in an IGD device under test can be enabled by
configuring the testvar supportsTr111Part1 to yes. When TR-111
Part 1 is enabled, CDRouter can run the TR-111 Part 1 tests from the od128
module. There is also an additional tr111_part1.tcl module with additional
coverage of TR-111 Part 1. During any TR-111 Part 1 testing, CDRouter will
create LAN side devices to associate with the IGD device.
NOTE: TR-111 Part 1 testing requires at least 1 Ethernet LAN interface.
TR-111 Part 2 (TR-069 Annex G: Connection Request via NAT Gateway)
Support for TR-111 Part 2 in an IGD device or LAN side TR-069 device under test
can be enabled by configuring the testvar supportsTr111Part2 to
yes. This testvar defaults to no. When TR-111 Part 2 is enabled, CDRouter will
attempt to read the NATDetected and UDPConnectionRequestAddress parameters
when it first learns about a TR-069 device. CDRouter will also enable STUN on
the device and set up active notification of these parameters. If NAT is
detected and the UDPConnectionRequestAddress is provided, CDRouter will switch
to UDP style connection request attempts instead of TCP based requests.
By default, the ACS STUN server does not require authentication on STUN Binding
Requests. When the ACS configures the STUN settings on the CPE, it automatically
generates a STUN username and STUN password for the CPE. The ACS server will
only require authenticated STUN Binding Requests when the testvar STUNAuth
is set to yes. The ACS will configure the maximum and minimum STUN
keep alive intervals to 60 seconds by default. These can be changed using the
testvars STUNMaximumKeepAlivePeriod and STUNMinimumKeepAlivePeriod.
TR-143 Testing
Support for TR-143 performance testing over HTTP is with the tr143_http.tcl test module. This module requires an NTA1000, the CDRouter Performance expansion, and optionally the CDRouter IPv6 expansion.
CDRouter currently supports TR-143 testing over HTTP using a new high performance HTTP server that is included with the CDRouter Performance expansion. Support for TR-143 testing over FTP and UDP transports may be added in future releases.
The tr143_http test module includes a mix of functional, performance, and negative tests, including:
- Tests for verifying the upload and download functionality of the DUT using various IPv4 and IPv6 address and domain based URLs
- Tests that measure the DUT’s upload and download throughput
- Tests that measure the DUT’s upload and download response time
- Tests that simulate various error conditions and verify that the DUT properly reports these conditions to the ACS
TR-143 Configuration
To run the tr143_http test module, test testvar supportsPerformance
must be set to yes. Additional TR-143 specific configuration options can
also be found in the TR-143 Performance Tests portion of the CDRouter
configuration file.
In this section individual upload and download thresholds and maximum response times can be set using the following testvars:
tr143HttpDownloadHighThresholdtr143HttpDownloadLowThresholdtr143HttpDownloadResponseMaxtr143HttpUploadHighThresholdtr143HttpUploadLowThresholdtr143HttpUploadResponseMax
These testvars are used to set thresholds for determining pass or fail results in each test.
In addition, the size of files used by CDRouter for uploads and downloads can also be configured using the following testvars:
The default file size is 1 Mbyte. Using small download and upload file sizes may lead to inaccurate throughput measurements.
TR-143 Capture Files
As with all CDRouter performance tests, the TR-143 tests do not capture performance traffic by default. This is done intentionally to limit the size of the test logs and ensure the best overall performance of the system. For debugging purposes, capturing during performance tests can be enabled. Please refer to the CDRouter Performance User Guide for more information.
TR-143 Performance Graphs
Performance graph support is enabled for the following TR-143 test cases:
| Test Case | Description |
|---|---|
| tr143_http_3 | Measure IPv4 HTTP download throughput |
| tr143_http_7 | Measure multi-connection IPv4 HTTP download throughput |
| tr143_http_13 | Measure IPv4 HTTP upload throughput |
| tr143_http_13 | Measure multi-connection IPv4 HTTP upload throughput |
| tr143_http_103 | Measure IPv6 HTTP download throughput |
| tr143_http_107 | Measure multi-connection IPv6 HTTP download throughput |
| tr143_http_113 | Measure IPv6 HTTP upload throughput |
| tr143_http_117 | Measure multi-connection IPv6 HTTP upload throughput |
Please see the CDRouter Performance User Guide for more information on how to configure and view performance graphs. For best results looping or repeating performance tests is recommended. This allows the performance of a particular test scenario to be plotted over time.
TR-143 Testing Exercises
Aside from running each test case included in the tr143_http.tcl module, a number of other interesting tests are possible with CDRouter. The following testing exercises are recommended.
- Run the Download, DownloadTCP, Upload, UploadTCP profiles tests before and after
- Try different Download and Upload file sizes
- Repeat Download and Upload tests to produce TR-143 Performance graph
LAN Side TR-069 Devices
Starting with CDRouter TR-069 release 3.8, LAN side TR-069 aware devices can be tested using the od128.tcl test module. When testing a LAN side TR-069 device, the device must be connected to an IGD device that provides a WAN connection and NAT. Since the LAN side device is now behind NAT, the device must either support TR-111 Part 2 or a port mapping must be created on the IGD. When working with port mappings on the IGD, CDRouter must either be configured with a URL that works with the port mapping on the IGD, or CDRouter can create a port mapping dynamically via TR-069, if the IGD supports TR-069.
CDRouter TR-069 currently supports testing TR-104 VoIP and TR-135 STB devices using the od128.tcl test module.
LAN side TR-069 devices can be configured using testvar groups. Each LAN side
TR-069 device must be named tr069_device2 through tr069_device8. The testvar
group contains configuration items unique to each TR-069 LAN side device. Only a
small number of testvars are required for each LAN device.
When LAN side TR-069 devices are used, the Serial Number and OUI for all TR-069
devices involved in the test setup must be configured. To tell CDRouter to run
all test cases against a LAN side TR-069 device instead of the normal IGD
device, the global testvar acsTargetDevice must be set to the
testvar group name of the desired LAN side device. Otherwise, CDRouter will
default to running all TR-069 tests against the IGD defined in the main CDRouter
configuration.
Configuration Options
The following table describes each entry available to LAN side TR-069 devices:
acsDefaultUseracsDefaultPasswordacsCpeDefaultUseracsCpeDefaultPasswordacsCreatePortMapOnIGDacsPortMapPublicPorttr69DeviceOuitr69DeviceSntr69DeviceTypetr69DownloadImagetr69DownloadOriginalImagetr69DUInstallImagetr69DownloadConfigacsCpeConnReqURLacsCpeConnReqURLMapped
Example 1: LAN Side TR-104 Device with TR-111 Part 2
In the example below, CDRouter is assumed to already have a working configuration for an IGD device with TR-069 enabled. A new device with TR-104 and TR-111 support has been added to the LAN side of the IGD. The following configuration will allow CDRouter to run all TR-069 related tests against the LAN side TR-104 device.
testvar acsTargetDevice             tr069_device2
testvar supportsTr111Part2          yes

testvar_group tr069_device2 {
  testvar acsDefaultUser          myata
  testvar acsDefaultPassword      qacafe123
  testvar tr69DeviceOui           001122
  testvar tr69DeviceSn            123
  testvar tr69DownloadImage       /usr/cdrouter-data/custom/files/myata.bin
  testvar tr69DeviceType          VoIP
}
Example 2. LAN Side TR-135 Device with Static Port Mapping on IGD
In the example below, CDRouter is assumed to already have a working configuration for an IGD device with TR-069 enabled. A new device with TR-135 support has been added to the LAN side of the IGD. The device does not support TR-111 and a port mapping has been created on the IGD device with a public IP address of 192.168.200.2. The LAN side device must define a URL that can be used through the IGD for the normal TCP based connection request mechanism. The following configuration will allow CDRouter to run all TR-069 related tests against the LAN side TR-135 device.
testvar acsTargetDevice             tr069_device3
testvar supportsTr111Part2          no

testvar_group tr069_device3 {
  testvar acsDefaultUser          mySTB
  testvar acsDefaultPassword      qacafe123
  testvar acsCpeConnReqURLMapped  http://192.168.200.2:1234/mySTB_request.htm
  testvar tr69DeviceOui           001144
  testvar tr69DeviceSn            124
  testvar tr69DownloadImage       /usr/cdrouter-data/custom/files/mySTB.bin
  testvar tr69DeviceType          STB
}
Example 3. LAN Side TR-135 Device with Dynamic Port Mapping on IGD
In the example below, CDRouter is assumed to already have a working configuration for an IGD device with TR-069 enabled. A new device with TR-135 support has been added to the LAN side of the IGD. The device does not support TR-111. CDRouter will automatically configure a port mapping on the IGD device with a public IP address of 192.168.200.2. The following configuration will allow CDRouter to run all TR-069 related tests against the LAN side TR-135 device.
testvar acsTargetDevice             tr069_device4
testvar supportsTr111Part2          no

testvar_group tr069_device4 {
  testvar acsDefaultUser          mySTB
  testvar acsDefaultPassword      qacafe123
  testvar acsCreatePortMapOnIGD   yes
  testvar acsPortMapPublicPort    5000
  testvar tr69DeviceOui           001144
  testvar tr69DeviceSn            124
  testvar tr69DownloadImage       /usr/cdrouter-data/custom/files/mySTB.bin
  testvar tr69DeviceType          STB
}
Example 4. LAN Side TR-135 Device with Manual Port Mapping on non-TR-069 Enabled IGD
Starting with CDRouter 7.0, the acsCpeConnReqURLMapped testvar
can be configured for the primary TR-069 device. In previous releases this
testvar was only supported for secondary TR-069 devices. This is useful for
testing TR-069 LAN side devices that are connected to non-TR-069 enabled
gateways. In these scenarios the TR-069 LAN side device is the primary TR-069
device in CDRouter’s config file. As a result, there are no additional
testvar_groups defined since the DUT is the only TR-069 enabled device in the
setup.
The acsCpeConnReqURLMapped testvar defines the mapped location
of the DUT’s TR-069 connection request URL. The DUT’s connection request URL
must be reachable using a manually created port mapping on the gateway that
forwards requests between the mapped connection request URL on the WAN to the
DUT’s actual connection request on the LAN.
For example, if the DUT’s connection request URL is http://192.168.1.5:5678/cwmp, and the gateway’s public IP is 5.5.5.5, the mapped URL will look like this, assuming port 5678 on the gateway is mapped to port 5678 on LAN host 192.168.1.5:
testvar acsCpeConnReqURLMapped http://5.5.5.5:5678/cwmp
Note that when the acsCpeConnReqURLMapped testvar is used for
the primary TR-069 device, the DUT’s OUI and SN must also be configured:
testvar tr69DeviceOui           e09153
testvar tr69DeviceSn            2673964
XMPP Connection Requests
The Broadband Forum has defined an XMPP based connection request mechanism in Annex K of TR-069 Amendment 6. The motivation for defining this new connection request mechanism is provided in section K.1:
K.1 Introduction

The CPE WAN Management Protocol can be used to remotely manage CPE that are
connected via a LAN through a Gateway. When an ACS manages a Device connected
via a NAT Gateway or firewall-enabled Gateway (where the Device cannot be
contacted  directly by the ACS), the CPE WAN Management Protocol can still be
used for  management of the Device, but with the limitation that the Connection
Request  mechanism defined in Section 3.2.2 that allows the ACS to initiate a
Session might not be  usable.

The procedures defined in this Annex allow an ACS to initiate a Session with any
Device, including Devices that cannot be contacted directly by the ACS. This
provides the equivalent functionality of the Connection Request defined in
Section 3.2.2, but makes use of a different mechanism, based on Extensible
Messaging and Presence Protocol (XMPP), to accommodate this scenario.

As it relates to Devices that cannot be contacted directly by the ACS, the
mechanism defined in this Annex does not assume that the Gateway, through which
the Device is connected, supports the CPE WAN Management Protocol. This
mechanism requires support only in the Device and the associated ACS.
Support for XMPP connection requests can be enabled by setting the testvar acsSupportsXmppConnReq
to yes. When enabled, CDRouter will
create an XMPP server on the same stack as the ACS. As a result, the XMPP server
shares the same domain name as the ACS, which is acs.cdroutertest.com by default.
If acsDeviceDiscovery is set to yes CDRouter will query the
DUT’s XMPP.Connection table during start to determine if an instance exists. If
an instance does exist CDRouter will update it to match the running XMPP server
configuration. If an instance does not exist CDRouter will issue an AddObject
RPC to create an instance which will then be configured with appropriate XMPP
server information.
If acsDeviceDiscovery is set to no, the DUT must be pre-
configured with the correct XMPP server information. The domain name must be
acs.cdroutertest.com and the username, password, and resource must all match the
values in CDRouter’s configuration file, as determined by the testvars provided
below.
Configuration Options
The following testvars define CDRouter’s XMPP server configuration:
acsSupportsXmppConnReqacsXmppServerConnectAlgorithmacsXmppConnReqUsernameacsXmppConnReqResourceacsXmppConnReqPasswordacsXmppConnReqUseTls
XMPP Server Address Resolution
The TR-069 specification defines a variety of methods for the DUT to dynamically
determine the IP address of the XMPP server. The acsXmppServerConnectAlgorithm testvar
indicates which of the following methods CDRouter will configure the DUT to use:
- DNS-SRV
The default method is for the DUT to send a DNS SRV record
request containing a specially constructed service name containing
“_xmpp-client._tcp” plus the domain of the ACS/XMPP server given by the
acsDomain testvar.
For example: _xmpp-client._tcp.acs.cdroutertest.com
A successful request will return a SRV record containing the FQDN and TCP port of the XMPP server.
- DNS
With this method, the DUT simply issues a standard DNS lookup for the
ACS/XMPP server domain name (acsDomain), and connects
to that address at TCP port 5222.
- ServerTable
With this method, the DUT will be statically configured by CDRouter with the FQDN and TCP port of the XMPP server.
XMPP Connection Requests Using TLS
TLS can be enabled for all XMPP connection requests by setting the testvar acsXmppConnReqUseTls
to a value of yes. When TLS is enabled
CDRouter will use the ACS server certificate, as defined by the testvars acsCertPath
an acsCaCertPath, for the XMPP server.
The DUT must have the appropriate intermediate and root CAs installed to
validate the XMPP server certificate. Please see the following knowledge base
article for more information:
- What root certificate must be installed to verify acs.cdroutertest.com.pem?
- Where can I find the most up to date SSL certificates for CDRouter’s ACS and download server?
CWMP Profile Testing
The Broadband Forum defines several CWMP Profiles to allow an ACS to quickly detect the data model parameters supported by a CPE device. A profile contains a subset of objects and parameters from the global data model that are related to a particular protocol or feature on the CPE. In order to support that protocol or feature in TR-069, a CPE must support all of the objects and parameters in the corresponding profile.
If a device claims support for a particular profile, it MUST support all required parameters included in that profile. This allows the ACS to have some commonality among all of the devices it is managing.
CDRouter uses these profiles to validate the DUT’s data model and verify it supports all of the required objects and parameters. All published data models can be downloaded in XML, HTML, and PDF formats from the Broadband Forum’s CWMP page.
CWMP Profile Test Modules
CDRouter provides a number of test modules specifically for CWMP profile testing. These correspond directly to the data model definitions published by the Broadband Forum.
When building your test package in CDRouter, you should select the test modules that correspond to the data model(s) and profiles supported by your DUT.
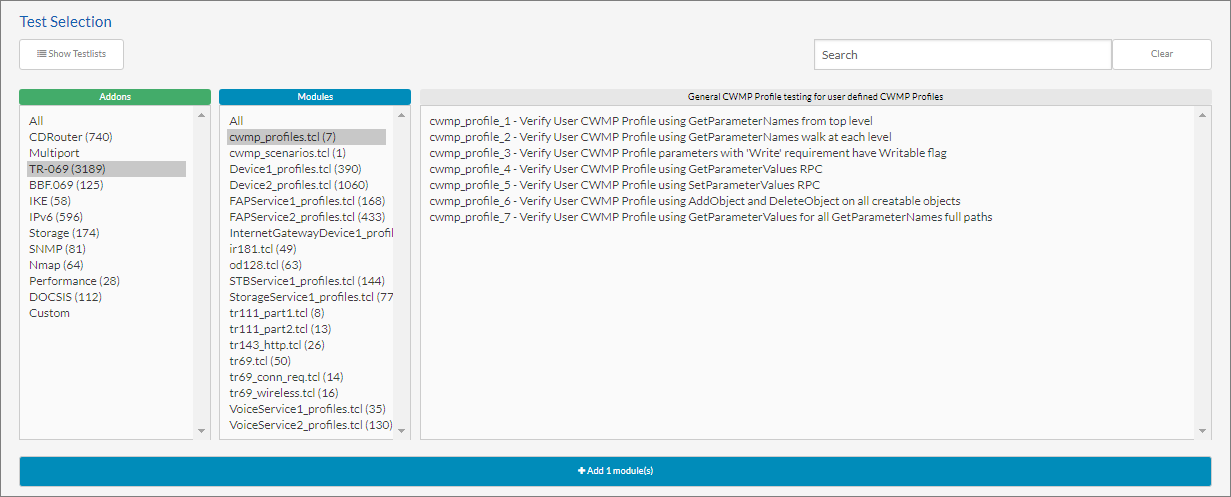
For each profile that you wish to test, CDRouter defines the following generic test cases to verify the support and consistency of that profile:
- Verify all required parameter names are returned using GetParameterNames
- Verify parameter name instances can be walked using GetParameterNames
- Verify all parameter names and values are returned using GetParameterValues
- Verify the read and write status of each parameter
- Verify all writable parameters can be set using SetParameterValues
- Verify the creation and deletion of all creatable objects using AddObject and DeleteObject
- Verify UserCWMPProfile using GetParameterValues for GetParameterNames full paths
Root Data Model Profiles
The root data model contains objects and parameters to allow the ACS to manage core functionality. As TR-069 has evolved, there are now three different versions of the root data model that have been published by the Broadband Forum, and every TR-069 device implements one of these versions. Although each version defines nearly the same set of profiles, there are significant differences within the profiles of each one.
| Test Module | Broadband Forum Publication |
|---|---|
| InternetGatewayDevice1_profiles.tcl | InternetGatewayDevice:1 (TR-098) |
| Device1_profiles.tcl | Device:1 (TR-106, TR-181 Issue 1) |
| Device2_profiles.tcl | Device:2 (TR-181 Issue 2) |
Service Data Model Profiles
Some classes of devices may also support one or more service data models that represent specialized functionality common to all devices in that class. CDRouter defines test modules to test any of the Broadband Forum service data models your DUT may support.
| Test Module | Broadband Forum Publication |
|---|---|
| InternetGatewayDevice1_profiles.tcl | InternetGatewayDevice:1 (TR-098) |
| STBService1_profiles.tcl | STBService:1 (TR-135) |
| VoiceService1_profiles.tcl | VoiceService:1 (TR-104) |
| VoiceService2_profiles.tcl | VoiceService:2 (TR-104 Issue 2) |
| StorageService1_profiles.tcl | StorageService:1 (TR-140) |
| FAPService1_profiles.tcl | FAPService:1 (TR-196) |
| FAPService2_profiles.tcl | FAPService:2 (TR-196 Issue 2) |
Custom Profiles
Many devices also support vendor-specific objects and parameters that are not defined by the Broadband Forum. Users can define their own custom CWMP profiles to test these parameters using CDRouter’s cwmp_profiles.tcl test module. Custom CWMP profiles can be used to verify any combination of parameters, including ones from multiple vendors and Broadband Forum parameters not included in other profile tests.
See the Creating Your Own Custom Profiles section below for more information on defining custom profiles.
Getting Started with CWMP Profile Testing
To ensure CDRouter runs the appropriate test modules, it must know which data model(s) and profiles the DUT supports. This can be provided in the config file or learned automatically from the DUT when it first contacts the ACS.
Discovering Data Model Profiles Automatically
If your device supports the DeviceSummary parameter, CDRouter will automatically select the list of CWMP profiles to test. When CDRouter receives the first TR-069 Inform from the device, CDRouter’s ACS will parse the DeviceSummary string and automatically omit any CWMP profiles that are not supported. If the DeviceSummary parameter is not supported, CDRouter will detect the DUT’s root data model by looking for other identifying parameters.
Once the root data model is found, CDRouter will omit any profile that doesn’t match. For example: if CDRouter detects a Device:2 root data model, all the Device:2 profile tests, along with all the service profile tests will be run.
Specifying Data Model Profiles in the Config File
It is also possible to specify which data models and profiles are supported by the DUT in the CDRouter config file. This is useful when testing devices that do not support the DeviceSummary parameter or to manually override the real DeviceSummary from the device.
The cwmpSupportedDataModel testvar is used for this
purpose and allows the following formats:
-
Profile List - The
cwmpSupportedDataModeltestvar may be specified as a list of supported profiles using the same format as the now-obsolete tr69FakeDeviceSummary testvar. The value of this testvar must conform to the format of the DeviceSummary parameter (defined in Section 3.7 of Broadband Forum TR-106 Amendment 2). This is the most explicit format and allows CDRouter to automatically skip any test cases for profiles that the DUT does not support. -
Data Model List - Instead of specifying a full list of profiles, the
cwmpSupportedDataModeltestvar can also accept a list of data models with their major and minor versions. This can be used to quickly state that all profiles up to and including the specified version number of a given data model are supported. This format is more expedient, but does not allow CDRouter to automatically skip tests for unsupported profiles. -
All Profiles - The special keyword “all” can be used to designate all available CWMP profiles in every data model. This can be used to select all available CWMP profiles regardless of the DeviceSummary reported by the device under test. However, users must take more care to only select only test modules for profiles the DUT actually supports.
-
Auto Discovery - The special keyword “auto” can be used to make CDRouter automatically parse the initial inform and learn the supported data model from the value of the DeviceSummary parameter.
Examples:
Profile List:
    testvar cwmpSupportedDataModel {InternetGatewayDevice:1.14[](Baseline:2)}
    testvar cwmpSupportedDataModel {Device:1.5[](Baseline:2,EthernetLAN:1), STBService:1.4[1](DiagPerfMon:1,BasicPerfMon:1,DigitalOutput:2)}

Data Model List:
    testvar cwmpSupportedDataModel {Device:2.13 VoiceService:2.0}

All Profiles:
    testvar cwmpSupportedDataModel all

Automatic Data Model Discovery:
    testvar cwmpSupportedDataModel auto
Data Model and Profile Version Numbers
Every data model and profile published by the Broadband Forum is defined with a version number. These are updated as the Broadband Forum continually publishes new revisions of both root and service data models.
If your DUT supports an older data model or an older version of a profile
within a data model, or if the DeviceSummary parameter does not
accurately reflect the DUT’s supported profiles, you can use the cwmpSupportedDataModel
testvar to account for this and ensure
CDRouter uses the correct versions when testing your device.
For example, cwmpSupportedDataModel is set to
’{Device:2.8}’, CDRouter will only test the versions of profiles that
were defined in the Device:2.8 root data model, and will automatically
skip any tests for profiles not defined in that version.
If cwmpSupportedDataModel is set to
’{InternetGatewayDevice:1.14}’, CDRouter will not verify
any of the parameters defined in the Baseline:2 profile defined in
the InternetGatewayDevice:1.14 root data model.
If cwmpSupportedDataModel is set to “all”, CDRouter will
test the latest available version of all profiles.
Backward Compatibility with Older Versions
Note that the DeviceSummary parameter has been deprecated
by the Broadband Forum and is not even defined in the current
Device:2 root data model (TR-181 Issue 2). As a result, it is usually
necessary to manually configure CDRouter to test Device:2 data models
using the cwmpSupportedDataModel testvar.
Note also that cwmpSupportedDataModel was added in
CDRouter 11.1 to replace
tr69FakeDeviceSummary, which has been obsoleted. Users
should update their config files to use cwmpSupportedDataModel
instead.
Excluding CWMP Parameters
In some cases, you may wish to exclude a parameter from the CWMP profile check
because it is not supported by the device under test. CDRouter allows you do to
this by configuring a list of parameters to skip in the cwmpSkipParameters
testvar. A list of parameters can be specified by
enclosing the list members between “{“ and “}”. The list of parameters can be
either full instances or generic instances that use “{i}” for each instance
index. Note that each individual parameter within the list must be specified
using a full instance or partial path, or a fully generic instance using “{i}”
for each index. Parameters cannot be specified using a mix of generic and full
instances. Here is an example:
testvar cwmpSkipParameters {
  InternetGatewayDevice.DeviceInfo.ModelName
  InternetGatewayDevice.LANDevice.{i}.USBLANConfigurationNumberOfEntries
}
If you are skipping an entire object path and all parameters contained below it,
you only need to specify the top object path. All top object paths (partial
paths) must end with a ‘.’ character. For example, if the device under test does
not support the LANConfigSecurity object from the TR-098 Baseline profile, you
could skip the object by configuring the following cwmpSkipParameters
testvar:
testvar cwmpSkipParameters {
  InternetGatewayDevice.LANConfigSecurity.
}
Modifying CWMP Parameters
All CWMP profiles supported by CDRouter and their corresponding objects and
parameters are defined in the /usr/cdrouter/tests/cwmp-profiles directory.
The type, requirement, or syntax of any of these pre-defined objects and
parameters can be modified using the cwmpModifyParameters
testvar. Like the cwmpSkipParameters testvar cwmpModifyParameters
supports a list.
When modifying parameters we recommend copying the original parameter definition
from the /usr/cdrouter/tests/cwmp-profiles directory and then making the
required modifications using cwmpModifyParameters. Here is an
example that modifies the enumeration syntax of the
InternetGatewayDevice.LANDevice.{i}.LANEthernetInterfaceConfig.{i}.MaxBitRate
parameter to support the additional keywords of auto and foo:
testvar cwmpModifyParameters {
  string R InternetGatewayDevice.LANDevice.{i}.LANEthernetInterfaceConfig.{i}.MaxBitRate {enumeration {foo 10 100 1000 10000 Auto auto}}
}
Likewise, here is an example that changes the requirement of the
InternetGatewayDevice.Time.NTPServer1 parameter from write, W, to read-
only, R:
testvar cwmpModifyParameters {
  string R InternetGatewayDevice.Time.NTPServer1 {size {maxLength 64}}
}
Note that the syntax argument is optional when modifying parameters. If omitted CDRouter will only overwrite the type and requirement for the specified parameter. As a result the above example can be reduced to this:
testvar cwmpModifyParameters {
  string R InternetGatewayDevice.Time.NTPServer1
}
When modifying parameters that are part of a service object such as VoiceService or STBService, the root object should be specified as ‘root’, since it can be either InternetGatewayDevice or Device. Here is an example:
testvar cwmpModifyParameters {
  string R root.Services.VoiceService.{i}.VoiceProfile.{i}.SignalingProtocol
  unsignedInt R root.Services.VoiceService.{i}.VoiceProfile.{i}.MaxSessions
}
The Creating Your Own Custom Profiles section contains additional information regarding the format of parameters and data validation.
CWMP Parameter Data Validation
By default, CDRouter will perform data validation on CWMP profile parameters.
To disable data validation, set cwmpDataValidation to no.
When data validation is enabled, CDRouter will verify that the value of every
parameter is syntactically correct according to syntax information contained
within the Broadband Forum’s official XML data model definitions. If a
parameter fails data validation, CDRouter will print a message detailing why the
parameter’s value is incorrect and the test will fail. See the Data Validation
section for more information on what properties of a
parameter are checked when validation is enabled.
Creating Your Own Custom CWMP Profiles
Custom CWMP Profiles provide a way for you to import custom data model files that define additional objects and parameters supported by your CPE device. This allows you to test proprietary and vendor-specific parameters that do not exist in the Broadband Forum published data models.
Custom profiles are tested by adding the cwmp_profiles.tcl module to your test package. This module runs the same set of data model consistency tests that are used by the other CMWP Profile Test Modules.
Custom data model files
In order to add a custom CWMP Profile to your config file, you must provide a data model definition file containing the objects and parameters supported by your CPE device.
There are two ways to define your custom data model file:
-
XML file format - CWMP profiles can be defined by providing an XML file containing all of the custom object, parameter and profile definitions supported by your CPE device. The XML document must follow the same DM Schema syntax that is used for the standard data model definitions published by the Broadband Forum.
-
Text file format - Alternatively, custom CWMP profiles may be defined in a simplified syntax format that includes the type, access requirement, and optional syntax restrictions. Each file created in this format implicitly defines a single profile.
Custom profile configuration
To add custom CWMP profiles to your config file, you must define one or
more numbered cwmp_profile testvar_groups which will reference your
custom data model file(s). You can create up to 128 unique profiles named
cwmp_proflile1 through cwmp_profile128.
Custom profile files can be created under the /usr/cdrouter-data/custom
directory.
Each cwmp_profile testvar_group contains the following testvars:
-
cwmpProfileName: This specifies the name of your custom profile. -
cwmpProfilePath: The full path name on the NTA1000 platform where your custom XML or text data model file is located. -
cwmpProfileObject: This is the name of the standard Broadband Forum “Root Data Model” supported by the CPE ("Device:2","Device:1", or"InternetGatewayDevice:1").
testvar_group cwmp_profile1 {
  testvar cwmpProfileName      myVendorParameters
  testvar cwmpProfilePath      /usr/cdrouter-data/custom/myVendorParameters.xml
  testvar cwmpProfileObject    Device:2
}

testvar_group cwmp_profile2 {
  testvar cwmpProfileName      additionalVendorParameters
  testvar cwmpProfilePath      /usr/cdrouter-data/custom/additionalVendorParameters.cwmp
  testvar cwmpProfileObject    Device:2
}
Generate XML data model file
It is possible for CDRouter to automatically generate an XML data model file by having the ACS query your CPE device for all of the parameters it currently supports. This can be used as a template for defining a “Custom CWMP Profile”.
❗ It is important to remember that the data model generated by CDRouter will only be as complete as the responses from the CPE. You MUST perform your own verification checks to ensure the generated file is correct and matches what the CPE is expected to support.
To configure CDRouter to generate an XML data model file, add a numbered
cwmp_profile testvar_group to your config file with the cwmpProfilePath testvar to "auto" instead of an actual profile path.
testvar_group cwmp_profile1 {
  testvar cwmpProfilePath      auto
}
In this situation, during the start procedure CDRouter will
perform a GetParameterValues and GetParameterNames on the root object
of the DUT’s data model. The names, types, and writability of the
parameters returned by the RPCs will then be used to construct one
large profile which will be used as a user defined cwmp_profile for
the custom tests.
CDRouter will use this information to generate an XML data model file named
cwmp-extracted-data-model.xml and save it to the log directory of the test
run. This file can then be used in future test runs as a custom profile.
This file should serve as a starting point and should not be interpreted as the exact or correct data model the DUT was expected to implement.
XML syntax for custom profiles
Custom XML documents supported by CDRouter 10.6 and newer versions must use the same format as the standard data model definitions published by the Broadband Forum.
TR-106 Amendment 7 specifies the Data Model Template for defining objects, parameters and profiles supported by TR-069 devices. The XML “DM Schema” is found in Appendix A.
TR-106 and the latest versions of standard root data model XML documents can all be found on the Broadband Forum CWMP website. You may use these documents as a model to define your own custom profiles.
Simplified syntax for custom profiles
Custom profiles can also be defined using a simple text file with the “.cwmp” extension that contains the definition of each object and parameter in the profile. Each custom profile file should contain one CWMP object or parameter on each line.
The syntax for defining object and parameter requirements is specified below.
The format for defining each object representing nodes in the data model
hierarchy is "object <requirement> <path>". Note that all object <path>
definitions end in a trailing dot (’.’). Objects which contain variable
enumerated instances must be specified with the ‘{i}’ placeholder.
object P InternetGatewayDevice.X_Vendor.
object P InternetGatewayDevice.X_Vendor.FeatureA.
object POC InternetGatewayDevice.X_Vendor.FeatureA.Interface.{i}
The following requirements may be specified for object nodes.
| Requirement | Description |
|---|---|
| P | The parameter is a required object |
| PC | The parameter is a required object and creatable |
| PO | The parameter is an optional object |
| POC | The parameter is an optional object and creatable |
The format for defining parameters that return values is <type> <requirement> <path> [<syntax>]. The <syntax> argument is optional
and may be used to specify restrictions on the values the parameter may
have.
boolean W InternetGatewayDevice.X_Vendor.FeatureA.Interface.{i}.Enabled
string  R InternetGatewayDevice.X_Vendor.FeatureA.Interface.{i}.Type { enumeration { foo bar } }
The type field comes directly from the CWMP parameter definition. The following requirement options are available for parameters:
| Requirement | Description |
|---|---|
| R | The parameter is read-only |
| W | The parameter is writable and readable |
| WO | The parameter is writable but can not be read (password, keys, etc) |
Note: When defining custom profiles that include a parameter or
creatable object (either PC or POC, as defined above) with multiple
instances in its path, all parent instances for that object must have
been previously defined in the profile as well. For example, to properly
define the following vendor defined creatable object and parameter:
object POC InternetGatewayDevice.X_Vendor.FeatureA.Interface.{i}
boolean W InternetGatewayDevice.X_Vendor.FeatureA.Interface.{i}.Enabled
The custom profile must include the following:
object P     InternetGatewayDevice.
object P     InternetGatewayDevice.X_Custom.{i}.
object POC InternetGatewayDevice.X_Custom.{i}.Interface.{i}.
string RW InternetGatewayDevice.X_Custom.{i}.Interface.{i}.Type
Starting with CDRouter 10.5 MR1, custom profiles are loaded after all official
profiles defined by the Broadband Forum. This makes it possible to modify the
attributes of an official parameter by defining it in a custom profile. Note
that modifications made via the cwmpModifyParameters testvar are
applied after all profiles are loaded.
Data Validation
The <syntax> field must be a Tcl dictionary
value containing syntax
information used to validate the parameter’s value when cwmpDataValidation
is yes. The following table describes the keys that
may be present and how they are used during validation:
| Key | Value |
|---|---|
enumeration |
A Tcl list of all possible values for the parameter to hold |
pattern |
A Tcl list of patterns, the parameter must match at least one |
size minLength |
The minimum length in characters for the parameter |
size maxLength |
The maximum length in characters for the parameter |
range minInclusive |
The minimum value the parameter may hold |
range maxInclusive |
The maximum value the parameter may hold |
list is |
Must be true or false indicating whether the parameter is a list |
list size minLength |
The minimum number of elements in the list |
list size maxLength |
The maximum number of elements in the list |
Note that if list is is true, all other keys become specific to an element
in the list as opposed to the full parameter value. The snippet below outlines
the general structure of the syntax dictionary:
{
  enumeration { STR1 STR2 STR3... }
  pattern     { PAT1 PAT2 PAT3... }
  size        { minLength MIN maxLength MAX }
  range       { minInclusive MIN maxInclusive MAX }
  list {
    is   BOOLEAN
    size { minLength MIN maxLength MAX }
  }
}
For example, to define a parameter as being a list of strings with
between two and four elements and with possible values A, B, or C
which must each be exactly one character long:
string W InternetGatewayDevice.MyCustom.StringParam {
    list { is true size { minLength 2 maxLength 4 } }
    enumeration { A B C }
    size { minLength 1 maxLength 1 }
}
or to define an integer parameter that must have values within the range of ten to twenty-five:
int W InternetGatewayDevice.MyCustom.IntParam {
    range { minInclusive 10 maxInclusive 25 }
}
Profile Testing Issues
When starting CWMP profile testing, it is common to find unsupported or misspelled parameter names. The SetParameterValues testing can also detect issues with the data model that may need to be resolved. The following issues may occur:
-
The initial value of the parameter is not a valid value. CDRouter will attempt to read the initial value and write back this same value. If the initial value is not valid, the SetParameterValues test will fail.
-
The initial value of a parameter may be empty until some additional operation occurs. In some cases, it may be more useful to run the CWMP profile tests after running other TR-069 test cases. For example, some devices may not populate the IPPing parameters with valid values until the IPPing diagnostics have been run at least once.
Any parameters causing the testing to fail can either be skipped or modified.
CWMP Scenario Testing
CWMP Scenarios are lightweight custom test scripts you can develop to execute commands from CDRouter’s ACS to validate parameters, download and upload files, reboot the DUT, and more.
Details can be found in the TR-069 CWMP Scenario Scripting Guide in our Knowledge Base.
Testing Exercises
Aside from running each test case in CDRouter TR-069, other testing scenarios can be created. The following test scenarios are recommended.
Vary the ACS Configuration
The ACS has several different configuration modes that impact its behavior. It is worthwhile to test the ACS using several different configurations. Besides the options for http or https and the different authentication schemes (basic, digest), chunked transfer mode can be enabled or disabled. See the listing of ACS testvars in the Configuration section.
Long Duration Testing
Besides running through the CDRouter TR-069 test cases one time, it is recommended to set up long duration runs of the od128.tcl and tr69.tcl modules using a test package with the repeat option enabled. Frequent CWMP sessions will help verify that the TR-069 client will continue to operate over time.
XML Validation with Help from CDRouter
CDRouter TR-069 can help validate your device’s XML against the TR-069 CWMP
Schema. This schema is provided by CDRouter in
/usr/cdrouter/tests/cwmp.xsd. While CDRouter TR-069 is running, it can be
configured to save all XML input and output for later validation.
The testvar tr69XMLCapturePath should point to an empty
directory that will hold this XML. If this directory doesn’t exist, CDRouter
will attempt to create it for you. While the test is running, every XML payload
will be written to this directory in individual files prefixed by either
‘inbound’ or ‘outbound’. Inbound files will have been sent by the DUT where
Outbound will be payloads sent by CDRouter TR-069.
Once the test run is complete, you can use a third-party tool to validate your XML against the provided schema.
QA Cafe recommends using xmllint for schema validation. xmllint is part of libxml2 and is installed by default on most Linux distributions. To run xmllint against the saved XML and compare it to the CWMP schema, use the following syntax:
$ xmllint --noout /path/to/xml/*.xml --schema /usr/cdrouter/tests/cwmp.xsd
For more information on using xmllint, please visit http://xmlsoft.org/xmllint.html
Check Folded HTTP Header Behavior
HTTP 1.1 allows long headers to be folded onto multiple lines using a continuation character. Most HTTP clients and servers do not use folded headers by default. However, QA Cafe has seen cases of clients using folded headers and it is possible that special applications could use them in CWMP headers.
The CDRouter ACS can be configured to use folded HTTP headers for digest
authentication by configuring the testvar acsUseFoldedHeaders.
You can quickly check that folded HTTP headers are supported for the CPE’s
client and server side by enabling folded headers and then running through a set
of TR-069 tests.
Please see the Configuration section for a description of how
to set the testvar acsUseFoldedHeaders to enable folded HTTP
headers. Folded HTTP headers are not used by default. However, they will be
accepted if the CPE sends them.
Possible Problems
No Initial Inform Received from the CPE
If you configure the testvar acsWaitForInform, CDRouter will
wait up to this interval in order to receive the first Inform from the CPE. If
the Inform is not received, CDRouter will fail the startup phase and end the
test session. There are a couple of things to check if the Inform is not being
received during this interval.
-
NTP – Some devices will hold off sending the initial Inform while they try to synchronize the system clock using NTP. You can enable the built-in CDRouter NTP server to speed up this process.
-
Short wait interval – If you are using a small value for acsWaitForInform, you may need to increase this value.
-
CPE configuration – Verify that the CPE is configured with the correct IP or domain name of the ACS server. By default, CDRouter will populate the name
acs.cdroutertest.comin all of the CDRouter DNS servers. This domain name maps to the testvaracsIp.
CPE Periodic Informs vs ACS Connection Requests
In CDRouter’s default configuration the acsDeviceDiscovery and
tr69InitiateConnection testvars are both set to ‘yes’ which
allows CDRouter to quickly progress through testing by disabling Periodic
Informs on the CPE, and connecting to the CPE’s Connection Request URL to
initiate a CWMP session whenever one is required. CDRouter TR-069 will enable
Periodic Inform during specific test cases where this is required. This is the
recommended configuration for most test environments.
However, CDRouter TR-069 is also compatible with CPE devices running with Periodic Informs enabled. To support this testing scenario, the following configuration changes must be made:
-
The
acsDeviceDiscoverytestvar must be set to ’no’. This will prevent the ACS from disabling Periodic Informs on the CPE. (Note that this will also prevent the ACS from learning the CPE’s Connection Request URL from the initial Inform message, and the ACS will not configure the CPE’s Connection Username and Password password parameters.) -
The
tr69InitiateConnectiontestvar should also be set to ’no’. This is not necessary but it will force the ACS to wait for the CPE’s next Periodic Inform message whenever a CWMP session is desired (rather than initiating a session using the Connection Request URL mechanism.) -
In cases where
acsDeviceDiscoveryis disabled and tr69InitiateConnection is enabled, the connection request URL, username, and password must all be manually configured in your CDRouter configuration file since they will not be learned or configured automatically by CDRouter (these must match what is currently configured on the CPE).
Note that in this scenario, the periodic inform interval is important since it determines how often CDRouter will receive an inform from the CPE. In particular, if you are planning to run tests with tr69InitiateConnection disabled, a good value for the periodic inform interval on the CPE is around 60 seconds.
Also be aware that if acsDeviceDiscovery is set to ‘yes’, but
tr69InitiateConnection is set to ’no’, most tests will fail
because CDRouter will not be able to initiate a CWMP session and the CPE will
not automatically send an inform to CDRouter in a timely manner (ie. there will
be no way for CWMP sessions to be reliably established in order to fulfill test
case requirements).
Invalid Certificate Using HTTPS
When using HTTPS, the ACS configuration on the CPE may need to use the domain
name of the ACS rather than the IP address in order to validate the ACS server
certificate. The default server certificate for the ACS included with CDRouter
is registered to the domain name acs.cdroutertest.com. CDRouter will automatically
configure this DNS name in all DNS servers used in CDRouter.
The ACS URL configured on the CPE should use the domain name.
For example:
https://acs.cdroutertest.com
The CDRouter configuration file would be as follows.
testvar supportsCWMP yes
testvar acsIp        6.0.0.1
testvar acsPort      443
testvar acsTransport https
CDRouter will automatically map the testvar acsIp (6.0.0.1 in
the example above) to the domain name acs.cdroutertest.com.
ACS is Unable to Request New CWMP Sessions
When the CDRouter ACS needs to communicate with the TR-069 CPE, it will attempt to initiate a new CWMP session using the CPE Connection Request URL. CDRouter will use the username and password from the acsDefaultCpeUser and acsDefaultCpePassword when trying to access this URL.
testvar acsCpeDefaultUser           cpeurl
testvar acsCpeDefaultPassword       cpe123
If the testvar acsDeviceDiscovery is set to yes, CDRouter can
automatically set the CPE Connection Request URL username and password during
the first CWMP session. This will ensure that the username and password match.
Tests Fail When the ACS is Not Configured to Initiate Connections
When setting up CDRouter TR-069 to run automatically, the testvar tr69InitiateConnection
should be set to yes. When tr69InitiateConnection
is set to yes, CDRouter will always initiate a
connection using the CPE Connection Request URL. However, some OD-128 test cases
specifically require the CPE to initiate a new connection by some local means.
This may be a reboot or local action. By setting the testvar tr69InitiateConnection
to no, you can execute these tests using the exact
OD-128 test procedure. This may require some level of manual intervention to
make sure the local action is executed when expected.
We recommend that you start out running with tr69InitiateConnection
set to yes.
Working Around a Failing CWMP Client
In some cases, you may need to have the CDRouter ACS enabled and configured, but
not wait for the initial Inform during the start phase. If the CWMP client does
not respond consistently to the CPE Connection Request URL or experiences other
failures, the start phase can be configured to skip the initial Inform by
configuring the testvar acsSkipInitialInform to yes.
OD-128 Test Case Notes
The test cases in the OD-128 test module, od128.tcl, are based on the test case procedures outlined in the OD-128 Interoperability Test Plan for TR-069 Plugfests (Rev 04) from the Broadband Forum. In some cases, the test cases have been modified slightly to allow for a fully automated test run. In other cases, the parameter names have been changed to parameter names that should always be supported. For example, OD-128 does reference specific parameter names for wireless interfaces which may not always be available.
Rev 04 of OD-128 includes provisions for devices implementing the Device:2 data
model defined in TR-181 Issue 2. The test parameters defined for Device:2
compliant IGD implementations in OD-128 Rev 04 are different than the parameters
defined for InternetGatewayDevice:1.x compliant IGD implementations. As a
result, CDRouter will automatically choose the correct parameters to use based
on the setting of the testvar tr69DeviceType. If tr69DeviceType
is set to “VoIP” or “STB”, CDRouter will test with the VoIP or STB specific
parameters defined in OD-128 Rev 03 and earlier, respectively. If tr69DeviceType
is set to “IGD”, CDRouter will attempt to autodetect which parameters to use
based on the IGD’s advertised root object. If the IGD’s root object is
InternetGatewayDevice CDRouter will use the older IGD parameters defined in
OD-128 Rev 04. If the IGD’s root object is Device CDRouter will use the newer
Device parameters in OD-128 Rev 04.
Note that a number of the parameters defined for InternetGatewayDevice:1.x implementations in OD-128 Rev 04 are invalid. As a result, CDRouter uses the parameters from earlier versions of OD-128 when testing InternetGatewayDevice:1.x implementations. In addition, specific notes about each implemented OD-128 test case are included below.